Category: Recipe

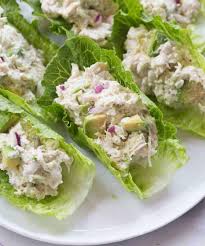
Yummy Avocado Chicken Salad Lettuce Wraps recipe

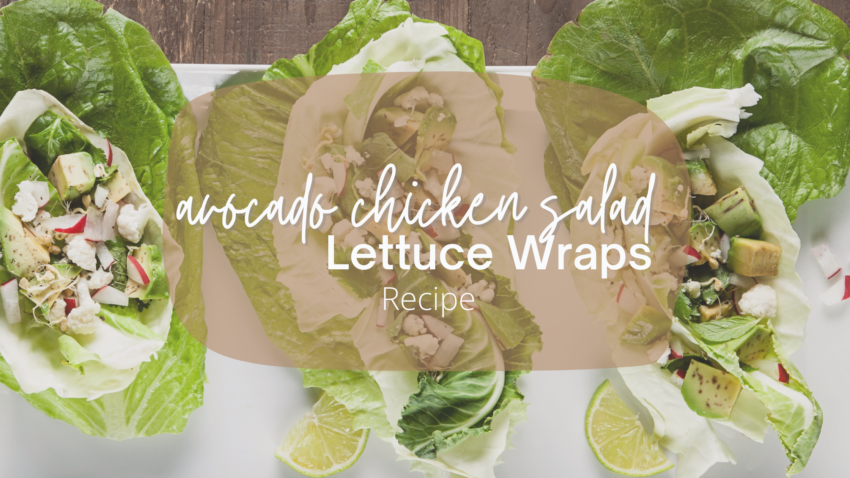
Looking for a healthy lunch that’s easy to make and packed with healthy fats? I love these avocado chicken salad lettuce wraps—they’re one of my go-to meals when I’m trying to keep things light but satisfying. They’re perfect for a quick dinner, lunch, or even something I whip up the night before (if I can resist eating it all and save some for the next day!). With minimal cooking and loads of flavor, this California avocado-inspired dish has definitely become one of my favorite lettuce wrap recipes. Give it a try!

If you’re a chicken salad fan, you may like my macro friendly waldorf chicken salad.

Jump to Recipe Jump to Recipe

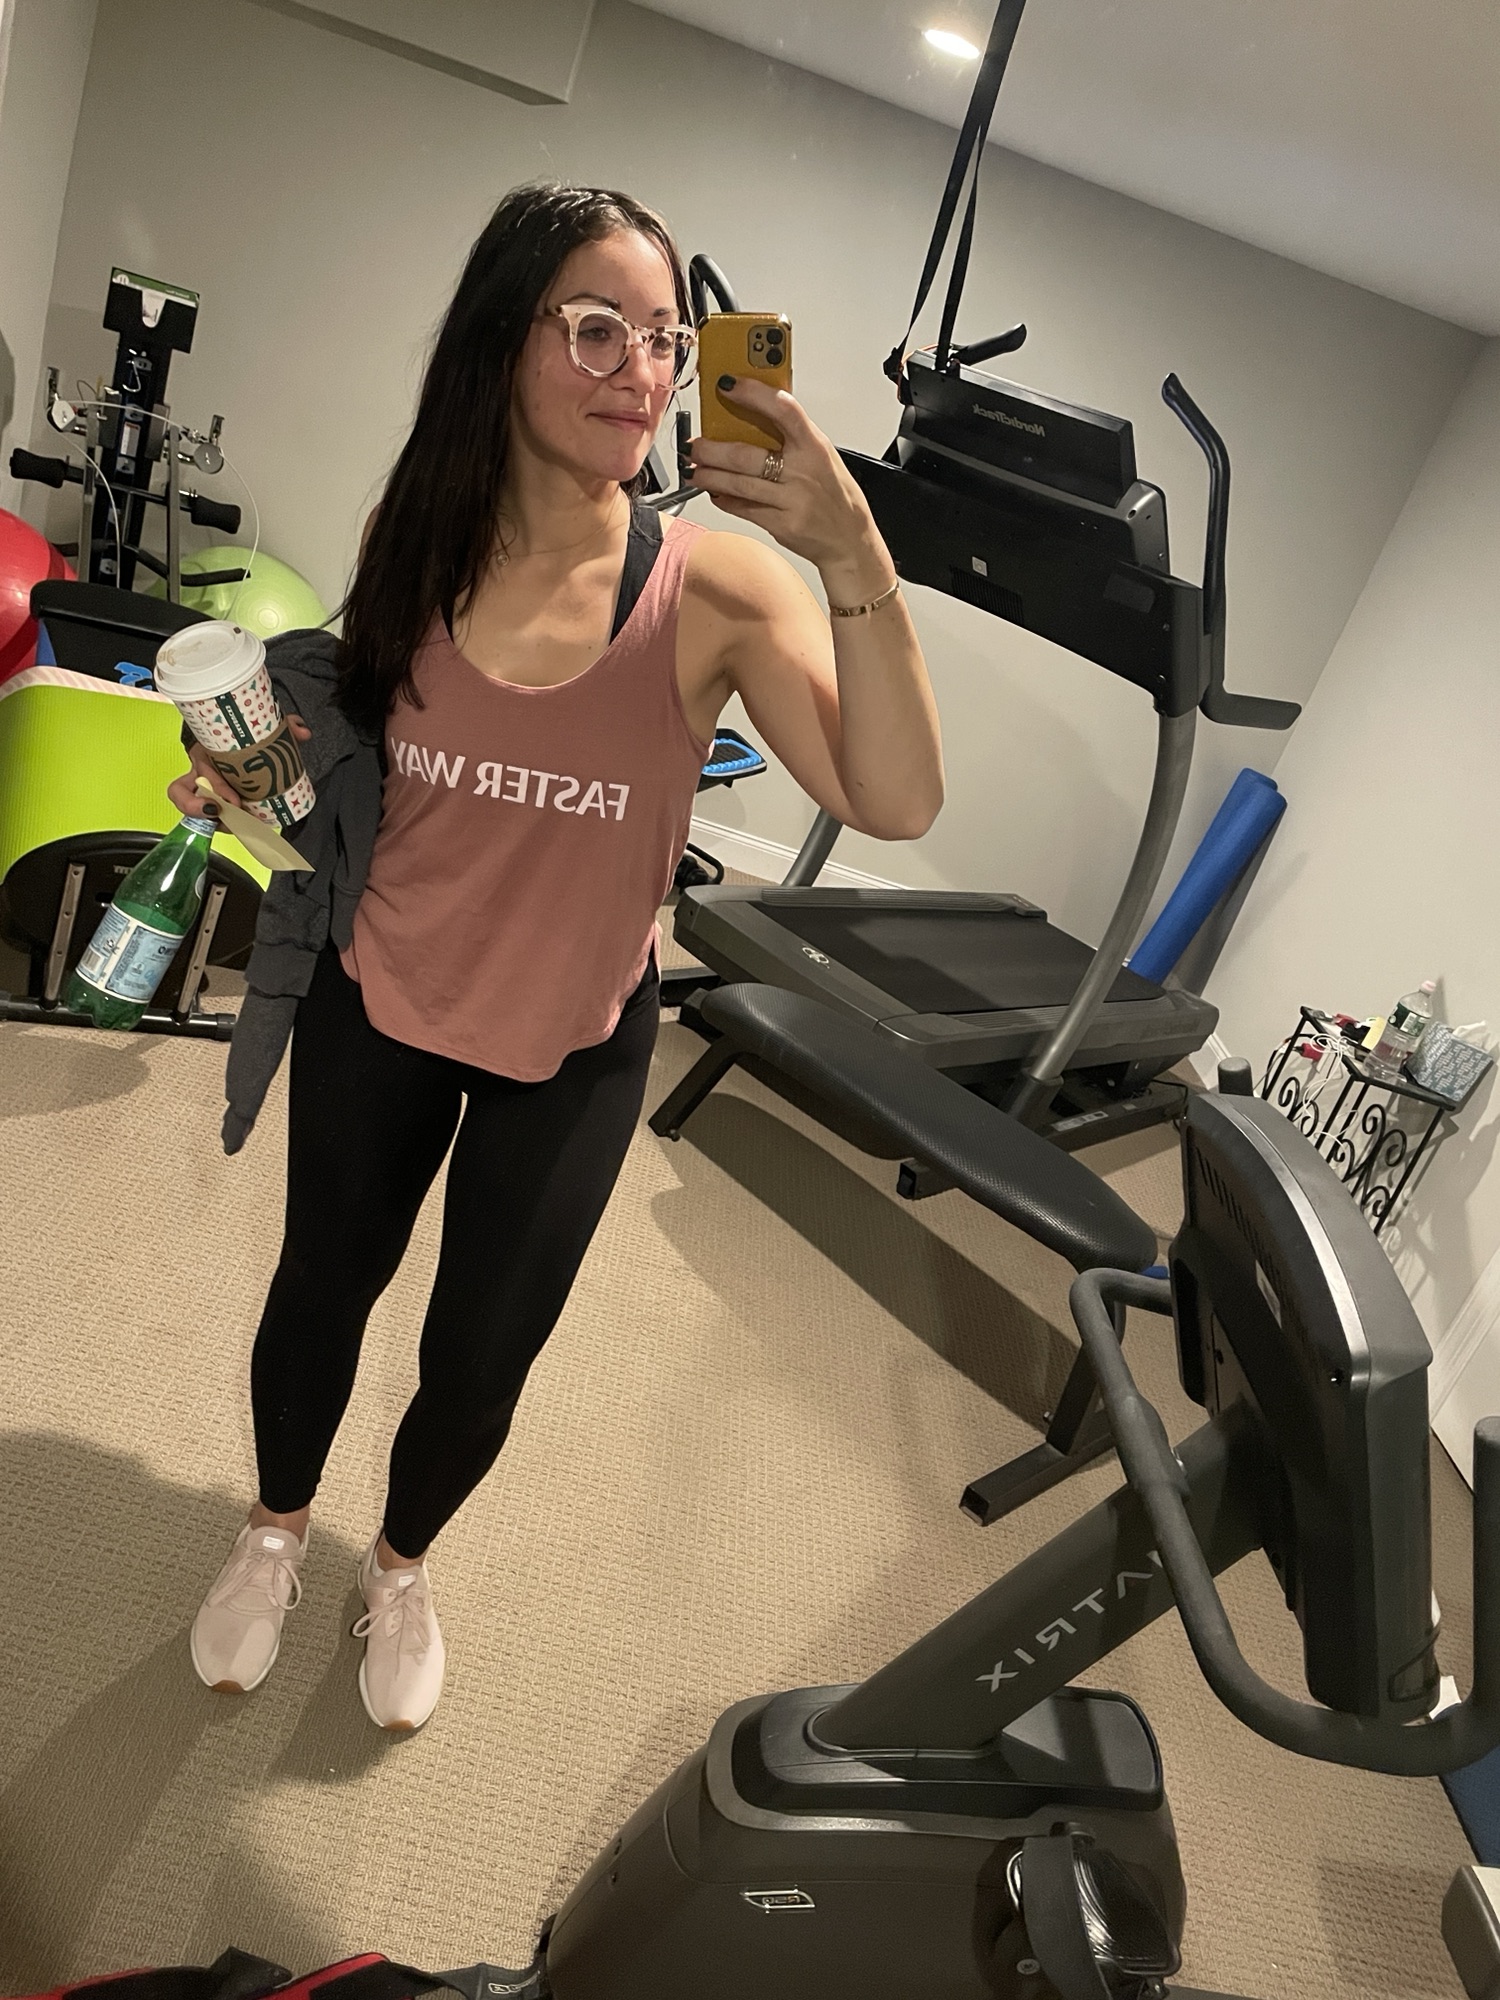
Fast, Fresh & Fat-Loss Friendly! 🚀🥑

Kickstart your health journey with these 3 FREE guides—perfect for intermittent fasting, weight loss on the go, and jumpstarting fat loss. Grab yours and make healthy eating easier than ever! 💪

On The GO

Chilled iced coffee in a Starbucks cup on a wooden table creating a refreshing vibe.

I love cooking, but it seems like with 2 school aged children, we are always on the go. Here are some of my go-tos.

Jumpstart Fat Loss

A woman pinches her tricep skin to evaluate body fat in a fitness context.

If your new year’s resolution isn’t delivering results, this fat loss guide is for you. Start feeling the difference right away 🙂

Intermittent Fasting Quiz

A woman holding a pitcher of water and a glass in a sunny outdoor setting.

Research suggests intermittent fasting can be an effective way to maintain and achieve a healthy weight. But is it right for you?

😍 Why You’ll Love Avocado Chicken Salad Lettuce Wraps  

  • Minimal Cooking: Spend as little time as possible in the kitchen with this recipe. Whether you’re using a pre-cooked chicken breast or rotisserie chicken from the grocery store, or even Costco canned chicken you’ll have these wraps ready in no time.  
  • Handful of Ingredients: You only need a few staples like Greek yogurt, black pepper, and lemon juice, paired with fresh produce like ripe avocados, celery, and romaine lettuce.  
  • Healthy and Low-Calorie: Packed with healthy fats from the avocado, these wraps are perfect for anyone tracking a calorie diet or aiming to keep things light.  
  • Refreshing on a Hot Summer Day: Skip heavy meals! These wraps are light, fresh, and exactly what you need to cool down.  
  • Customizable: Whether you prefer lime juice over lemon juice, or like to throw in extras like green onions or red onion, there’s plenty of room to make them your own.  

🗒️ Ingredients + Substitutions  

To make these simple lettuce wraps, here’s what you’ll need from the grocery store:

  • chicken breast, cooked and shredded. If you’re short on time, use a rotisserie chicken for convenience! Canned Kirkland chicken breast is also a good option. 
  • avocado, mashed. Use a fresh avocado or hass avocados for the creamiest flavor. I also use Kirkland avocado mash cups when I have them.
  • Greek yogurt. Swap with lite sour cream if needed. 
  • mustard. Dijon mustard works well for a punchier flavor
  • lemon juice. Lime juice works too  
  • celery stalk, chopped  
  • Salt and black pepper, to taste  
  • Romaine lettuce leaves (or use butter lettuce, bibb lettuce, or lettuce cups for variety)  

Optional add-ins for extra crunch and flavor:

  • Green onions  
  • Red onion, finely diced  
  • Large avocados for garnish  

💡 Gluten-Free? Read This!  

This delicious recipe is naturally gluten-free, thanks to the use of lettuce leaves rather than bread or wraps. Butter lettuce or bibb lettuce makes a crunchy and pliable replacement for traditional tortillas, while Romaine lettuce provides a crisp texture that’s perfect for these chicken wraps.  

👩‍🍳 How to Make My Avocado Chicken Salad Lettuce Wraps  

Follow these simple steps to assemble this healthy lunch in no time:

Cook and Shred the Chicken  

If you’re starting from scratch, cook the chicken in a large skillet over medium heat until done. Alternatively, shred leftover chicken from last night, or grab a rotisserie chicken for a quick option.  

Mix the Chicken Salad Mixture  

Using a large bowl (or mixing bowl), combine shredded chicken, mashed ripe avocado, Greek yogurt, mustard, and lemon juice. Add the chopped celery, then season with salt and black pepper to taste. Mix until well combined.  

Prepare the Lettuce Cups  

Wash and dry your Romaine lettuce (or butter lettuce) leaves, ensuring they’re clean and crisp.  

Serve and Enjoy  

Spoon the chicken salad mixture into your lettuce cups or wraps, and serve immediately. Garnish with diced red onion, green onions, or even a sprinkle of Vitamin C-packed lemon zest if desired.  

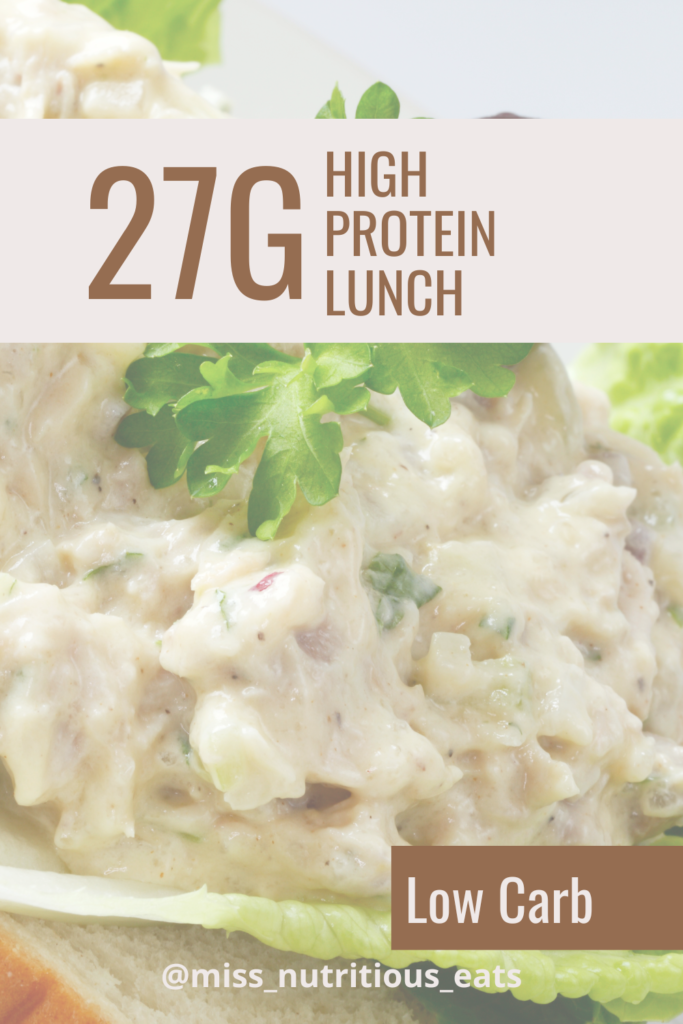
This good way to utilize leftover chicken also makes a great source of high protein, perfect for those on the go!  

📓 Best Served With  

These avocado wraps pair beautifully with light and refreshing sides. Try these combos:

  • A simple salad drizzled with a vinaigrette.
  • A side of fresh fruits to add natural sweetness.  
  • Sparkling water with a splash of lime juice.

👝 How to Store Leftovers  

Got extras? Store any leftover chicken salad mixture in an airtight container and refrigerate. It keeps well for 3-4 days, making it a great lunch idea for the week ahead. Pro tip: Keep the mixture separate from the lettuce leaves for maximum freshness when assembling your wraps later!  

Join my next 6 week challenge!

Tired of endless diets and no results? Join the FASTer Way to Fat Loss and see real, sustainable changes in just 6 weeks!

Melanie Marcus FASTer Way to Fat Loss Coach

🧠 Common Questions  

Q1. Can I use a food processor for the chicken salad mixture?  

Absolutely! If you prefer a finer texture, blend the ingredients in a food processor before stirring in chopped celery.  

Q2. Can I make these wraps ahead of time?  

Yes, but for best results, assemble the wraps just before serving. Store the salad mix separately from the bibb lettuce, and your wraps will stay fresh.  

Q3. Are there vegetarian substitutes?  

For a vegetarian twist, swap the chicken breast with chickpeas or tofu crumbles.  

💪🏼 Tracking Macros? Check This Out  

With this avocado chicken salad lettuce wrap, you’re tapping into the trifecta of balanced nutrition—healthy fats, high protein, and low carbs. At just 230kcal per serving, it’s packed with 27g of protein, 11g of fat, and only 7g of carbohydrates. While we love carbs in the FASTer Way, when we’re carb cycling, high fat and protein is the way to go.

If you try this recipe, and I hope you do! – Let me know in the comments below!

Avocado Chicken Salad Lettuce Wraps

Servings 2
Calories 230 kcal

Ingredients
  

  • 8 oz chicken breast cooked and shredded
  • 1/2 avocado mashed
  • 1 tablespoon Greek yogurt unsweetened
  • 1 tablespoon mustard
  • 1 tablespoon lemon juice
  • 1 celery stalk chopped
  • Salt and pepper to taste
  • 4 large Romaine lettuce leaves

Instructions
 

  • In a medium-sized bowl, combine the shredded chicken, mashed avocado, Greek yogurt, mustard, and lemon juice.
  • Mix well until all ingredients are thoroughly combined.
  • Add the chopped celery and season with salt and pepper to taste.
  • Stir everything together and serve the mixture inside the Romaine lettuce leaves for a fresh, low-carb wrap. Enjoy!

Nutrition

Calories: 230kcalCarbohydrates: 7gProtein: 27gFat: 11gSaturated Fat: 2gPolyunsaturated Fat: 2gMonounsaturated Fat: 6gTrans Fat: 0.01gCholesterol: 73mgSodium: 226mgPotassium: 836mgFiber: 5gSugar: 2gVitamin A: 5000IUVitamin C: 12mgCalcium: 44mgIron: 1mg
Tried this recipe?Let us know how it was!

Turkey Sausage Scramble Recipe with 28g Protein

Need a tasty, protein-packed breakfast to kickstart your day? This turkey sausage breakfast scramble has you covered delivering 28g protein per serving! It’s loaded with turkey sausage, eggs, fresh bell peppers, and creamy avocado—basically, everything you need for a satisfying and healthy start. Whether you’re tracking macros, tryin to stay low carb or counting Weight Watchers points, this is an easy, balanced meal, this dish is super customizable and totally hits the spot.

Jump to Recipe

😍 Why You’ll Love This Turkey Sausage Breakfast Scramble  

  1. High in Protein – Packed with turkey sausage and eggs, it’s the perfect breakfast to fuel your body and keep you energized throughout the day.
  2. Easy to Customize – Add your favorite veggies, swap ingredients, or adjust portion sizes to fit your needs.
  3. Meal Prep Friendly – Make it ahead of time and enjoy a healthy, stress-free breakfast on busy mornings. Did you know you can freeze scrambled eggs?
  4. Weight Watchers Approved – With its balanced whole food ingredients, this recipe fits into nearly every healthy eating plan.
  5. Bursting with Flavor -The savory turkey sausage and creamy avocado make every bite something to enjoy.

Bonus: it’s great for meal prep, so busy mornings are no problem.

Jump to Recipe

🗒️ Ingredients + Substitutions  

large eggs: Eggs are the main protein base. You can substitute with liquid egg whites for a lower-fat option, or use a mix of eggs and egg whites to balance flavor and nutrition. Plant-based egg alternatives like JUST Egg can also work for a vegan version.

lean turkey sausage, crumbled: This adds protein and savory flavor. You can swap it with breakfast turkey sausage, chicken sausage, or plant-based sausage for a vegetarian option.

diced bell peppers: Bell peppers add color, crunch, and nutrients. Feel free to use any color or replace them with diced sweet potatoes, green onions, or even zucchini for variety.

coconut oil: Coconut oil provides a rich flavor, but for a lighter option, use olive oil or nonstick spray. Butter or ghee can add a creamy texture if preferred.

Optional toppings: Toppings like cheddar cheese, onion powder, or hot sauce boost flavor. For dairy-free options, try nutritional yeast or plant-based cheese. Other toppings like salsa or fresh herbs can brighten it up too!

💡 Gluten-Free? Read This!  

This turkey sausage breakfast scramble is naturally gluten-free but always check your turkey sausage label for ingredients like citric acid. Some food products may include additives!  

👩‍🍳 How to Make My Turkey Sausage Scramble  

Heat Coconut Oil in a Skillet  

Use a large skillet over medium heat. Add crumbled turkey sausage and cook until the internal temperature reaches 165°F. Remove and set aside.  

Sauté Bell Peppers  

Sauté diced bell peppers in the same skillet for 2-3 minutes until softened.  

Scramble Eggs  

Whisk whole eggs in a medium bowl, pour eggs into the skillet, and stir occasionally to create fluffy scrambled eggs.  

Combine and Season  

Add the turkey sausage crumble back into the skillet and mix everything together. Season with salt, black pepper, or onion powder.  

Top with Avocado and Cilantro  

Fold in diced avocado and sprinkle fresh cilantro for a finishing touch. Tons of flavor in every bite!  

📓 Best Served With  

  • Low Carb Option: Pair with a spring mix or roasted veggies like sweet potatoes.  
  • Balanced Macro Option: Add a slice of sourdough bread, hash browns, or fresh fruit like berries or melon.  
  • For Variety: Incorporate into sausage breakfast burritos or a breakfast casserole for meal prep!  

Join my next 6 week challenge!

Tired of endless diets and no results? Join the FASTer Way to Fat Loss and see real, sustainable changes in just 6 weeks!

Melanie Marcus FASTer Way to Fat Loss Coach

👝 How to Store Leftovers  

  • Store the turkey sausage breakfast scramble in an airtight container in the fridge for up to 3 days.  
  • Reheat on a skillet over medium heat or try using an air fryer for even heating.  

🧠 Common Questions  

Can I use liquid egg whites instead of whole eggs?  

Yes! Liquid egg whites are a perfect way to reduce the fat and calorie content while maintaining the grams of protein.   

Is this recipe Weight Watchers-friendly?  

Absolutely! Use the WW app to track specific ingredients like lean ground turkey, veggies, and eggs.  

I struggle breaking my fast with 30g protein, any other suggestions

Chocolate Baked Oatmeal

Check out these 30 ideas for meals made with cottage cheese.

💪🏼 Tracking Macros? Check This Out  

  • Protein: ~25 g protein per serving, thanks to lean turkey sausage and whole eggs.  
  • Fat: Adjust with olive oil, cooking spray, or liquid egg whites for lower g fat options.  
  • Carbs: Minimal carbs—pair with veggies like black beans or sweet potatoes for added fiber.  

Avocado and Turkey Sausage Scramble

A quick, protein-packed turkey sausage scramble with eggs, veggies, and avocado that's perfect for a healthy start or easy meal prep.
Prep Time 5 minutes
Cook Time 10 minutes
Total Time 15 minutes
Course Breakfast
Cuisine American
Servings 4
Calories 316 kcal

Ingredients
  

  • 8 eggs large
  • 4 oz lean turkey sausage crumbled
  • 1 avocado diced
  • 1/2 cup bell pepper diced
  • 1 tbsp coconut oil
  • 1 tbsp fresh cilantro chopped (optional)
  • salt and pepper to taste
  • 1 cup egg whites

Instructions
 

  • In a skillet, heat the coconut oil over medium heat.
  • Add the crumbled turkey sausage and cook until browned and fully cooked, about 5-7 minutes.
  • Remove the sausage from the skillet and set it aside.
  • In the same skillet, sauté the diced bell pepper for 2-3 minutes until slightly softened.
  • Whisk the eggs in a bowl, then pour them into the skillet, stirring occasionally to scramble.
  • Once the eggs are almost set, add the cooked turkey sausage back into the skillet and mix everything together.
  • Season with salt and pepper to taste.
  • Finally, remove from heat and gently fold in the diced avocado and chopped cilantro before serving.

Nutrition

Calories: 316kcalCarbohydrates: 7gProtein: 28gFat: 22gSaturated Fat: 7gPolyunsaturated Fat: 3gMonounsaturated Fat: 9gTrans Fat: 0.1gCholesterol: 349mgSodium: 398mgPotassium: 578mgFiber: 4gSugar: 2gVitamin A: 1160IUVitamin C: 30mgCalcium: 66mgIron: 2mg
Keyword eggs, low carb, protein
Tried this recipe?Let us know how it was!

About Me

I’m Melanie.

I’m a chef, registered dietitian, foodie, wife and mom.
If you’re looking for quick and healthy meal inspiration that serves YOU and your family well, then you’ve come to the right place!

Melanie Marcus Selfie

Chocolate Chia Pudding Recipe (Fat bomb + low carb)

One night after dinner, I checked my macro tracker and noticed I was off by 100g fat.  One hundred grams! It was a low carb day and I made a fatal mistake.  I ate intuitively according to my regular macros, and didn’t account for fat changes in my carb cycling!  That’s where this chia pudding was born.  I’m not into fat bombs, you know, the ones that combine peanut butter and coconut, covered in chocolate but I do like a pudding, so here is what I came up with.  

Whether you’re following a low-carb diet, the ketogenic diet, or cycling between carb-up and low-carb days, this creamy keto chocolate chia pudding is here to keep you on track. Packed with healthy fats, 12 grams of fiber, and a rich chocolate flavor, this recipe for chocolate chia pudding is an ideal way to crush your sweet craving. And if balancing your fats is a common issues, check out this post all about fat macros.

😍 Why You’ll Love This Chocolate Chia Pudding  

The main reason this low carb chia pudding stands out is versatility. It makes the perfect low carb breakfast, a perfect snack, or even a keto dessert for those days when your sweet tooth just won’t quit. Here’s why it’s so loved among keto enthusiasts and low-carb dieters alike:

  • Rich and Creamy Texture: Thanks to full-fat coconut milk and optional toppings, this pudding mimics a decadent dessert.  
  • Loaded with Healthy Fats: Ingredients like ​chia seeds are a great source of omega-3 fatty acids and fatty acids to keep you full and satisfied.  
  • Perfect for Weight Loss Goals: High fiber and fat content help stabilize blood sugar and curb hunger, aiding in your weight loss momentum.  
  • Customizable for different flavors and textures, this base recipe can be adapted into a berry chia pudding, chocolate chia seed pudding, or even coconut chia pudding.  
  • Simple Steps = Big Results: This is an easy recipe made with whole foods, ready in under five minutes with no added sugar—you can even make it while meal prepping.  

🗒️ Ingredients + Substitutions  

Here’s what you’ll need to make this classic keto chocolate chia pudding:

  • 3/4 cup canned coconut milk:  Full-fat coconut milk helps increase total fats and offers a creamier texture.  If you don’t need as many fats, try using 2 or 4 oz coconut milk and substitute almond milk for the rest.  
  • 2 Tbsp chia seeds (can use ground chia seeds for a finer feel): These are essential for creating that magic gelatinous structure we all love.  
  • 1/2 scoop FASTer Way chocolate protein powder (or replace with unsweetened cocoa powder and a keto sweetener, like monkfruit or stevia).  
  • 1/2 tsp vanilla extract for enhanced flavor.  

Optional Toppings:

  • Mixed nuts, dusting of cacao powder, a dollop of coconut cream, or a drizzle of peanut butter or almond butter for an extra indulgent touch.

Substitutions for Personalizations:

  • Replace coconut milk with unsweetened almond milk or heavy cream for a lighter pudding with fewer total fats.  
  • For a twist on texture, top with dark chocolate shavings to enhance the chocolate pudding vibes.  

Make sure to scroll to the bottom of this post for the printable recipe card!  

Jump to Recipe

If your doctor or dietitian has suggested a heart-healthy diet, you might want to be cautious with this recipe. It’s pretty high in saturated fat, mostly from coconut, which is something to limit in these diets. While the fat gives the dish its rich, creamy texture and stays solid at room temperature, it might not fit the guidelines for heart health.

If you have questions about this, you can email me at [email protected]

💡 Gluten-Free? Read This!  

If you’re wondering whether this recipe caters to gluten-free diets, the answer is a capital Y-E-S! All listed ingredients are naturally gluten-free, as are most low-carb sweetener .

For the best results, always cross-check any flavoring or supplement product (like protein powders) for hidden added sugar or gluten derivatives. Stick to brands with clean ingredient lists to align with your whole foods diet.  I like to use the FASTer Way Chocolate Hydrobeef protein powder which has 98 calories and 20g protein.

👩‍🍳 How to Make My Chocolate Chia Pudding  

This creamy pudding comes together in three simple steps.  

  1. First Step: Combine the chia seeds, cocoa powder or protein powder, vanilla extract, and canned coconut milk in a mug or mason jar. 
  2. Whisk Well, no need for a food processor unless you want a smoother texture. Ensure the seeds are evenly dispersed to prevent clumps.  
  3. Refrigerate for 5-10 minutes:  Other recipes may need to Refrigerate for 4+ hours (or overnight) in an airtight container but because we’re using a thick coconut milk, this one comes together quickly.

Enjoy your low carb chocolate chia pudding cold for the best consistency.  

📓 Best Served With  

Make this the hero of your snack or breakfast with these fun pairings:

  • Top with fresh fruit like fresh blueberries or frozen strawberries for a pop of brightness.  
  • Make a berry chia pudding by layering with mixed berries once it’s firmed up.
  • Personally, I love to top with cocowhip and a handful of nuts if I have the macros.

👝 How to Store Leftovers  

This chia pudding keto recipe is perfect for meal prep! Here’s how you can store any leftovers:

  • Place pudding in an airtight container or keep individual portions in a mason jar.  
  • It lasts 5-7 days in the fridge. If your pudding thickens too much, stir in some room temperature coconut milk or unsweetened almond milk, even water to restore its creamy texture.  

🧠 Common Questions  

What are the grams of net carbs per serving?  

With 12g fiber and 22g total carbs, this pudding contains approximately 10g net carbs. Perfect for a keto dessert or snack on a low carb diet.

Are there other flavor options?  

Absolutely! This base recipe is highly versatile. Change up the protein powder flavor or omit it all together.  Add flavors like keto maple syrup, espresso shots, or crushed favorite berries for a twist.

Join my next 6 week challenge!

Tired of endless diets and no results? Join the FASTer Way to Fat Loss and see real, sustainable changes in just 6 weeks!

Melanie Marcus FASTer Way to Fat Loss Coach

💪🏼 Tracking Macros? Check This Out  

Nutritional Information (per serving):  

  • 596 calories  
  • 22g total carbs  
  • 12g fiber  
  • 51g fat  
  • 21g protein  

For accuracy, use food databases to verify the nutritional values of specific brands and toppings you choose. The combination of more sweeteners or toppings may adjust macro totals.

This keto dessert is not just low-carb; it’s nourishing and loaded with nutritional benefits like omega-3s and tons of fiber, all contributing to steady blood sugar and long-lasting satiety.

Start Making Chia-based Magic  

Whether you’re on a ketogenic diet, exploring chia recipe options, or simply on a mission for flavor-packed, nutrient-dense dishes, this low carb chocolate chia pudding checks all the boxes. It’s proof that clean eating can be ultra satisfying. If you’re a chocolate lover like me- try this chocolate oats recipe. I bet you’ll love it too!

Loved this recipe or have ideas to modify it? Share your experience in our comments below or tag us on social for a chance to be featured. And don’t forget to grab your ingredient list now from the printable recipe card at the bottom of this post.  

Chocolate Chia Pudding (Low Carb)

I like this recipe for low carb days when I have a lot of fats to make up for at the end of the day!
Prep Time 8 minutes
Course Dessert
Servings 1
Calories 596 kcal

Ingredients
  

  • 3/4 cup coconut milk canned, full fat
  • 1/2 scoop FW Chocolate Protein Powder 20g/scoop
  • 2 Tbsp Chia seeds
  • 1/2 tsp vanilla
  • 1 oz fancy nuts optional

Instructions
 

  • Combine the first 4 ingredients in your large mug or bowl.
  • Use a hand blender to combine everything and let firm up in the fridge for 5-10 minutes.
  • Top with nuts before serving.

Nutrition

Calories: 596kcalCarbohydrates: 22gProtein: 21gFat: 51gSaturated Fat: 39gPolyunsaturated Fat: 6gMonounsaturated Fat: 2gTrans Fat: 0.03gCholesterol: 25mgSodium: 54mgPotassium: 619mgFiber: 12gSugar: 7gVitamin A: 53IUVitamin C: 5mgCalcium: 229mgIron: 6mg
Tried this recipe?Let us know how it was!

Easy meatballs without the mess (baked + lean beef)

I may be alone on this, but I’m not a fan of saucey meatballs. So when I saw a recipe for sauce stuffed meatballs from Kat Ashmore, I was intrigued, and pleasantly surprised because they capture the flavors of Italian-American meatballs without the mess. And of course I had to see if I could lean them up just a little bit. So here they are, Easy Messless Meatballs with all the saucy, hearty flavor you love, minus the splatter—which is my favorite part. I also love that my kids and hubby love them too. With simple ingredients and a food processor both prep and cleanup are both effortless.  You’re welcome!

Jump to Recipe

😍 Why You’ll Love my Easy Messless Meatballs  

  • Mess-Free Cooking: No frying or splattering oil—just bake these perfect round balls on a parchment-lined baking sheet.  
  • Simple Ingredients: Using staples like parmesan cheese, ground beef, and fresh parsley keeps this recipe easy yet flavorful.  
  • Family Approved: These meatballs are packed with enough savoriness to please even the pickiest eater, from kids to meat eaters.  
  • Perfect for Meal Prep: Store leftovers or freeze extras in a freezer bag for a hearty meal later in the week.  
Jump to Recipe

🗒️ Ingredients + Substitutions  

Here’s what you’ll need to make these delicious meatballs with rich Italian seasoning and robust flavor.  

Parmesan Cheese: Swap it out for Pecorino Romano or nutritional yeast for a dairy-free option.  

Small Onion: Try shallots for a milder flavor or onion powder if you’re short on time.  If I’m making for Andy, I just leave the onion out.  

Garlic: Garlic powder or roasted garlic paste will work in a pinch.  Often, I will use frozen garlic cubes.

Stale Sourdough: Any type of stale bread or plain oats can make a great alternative. Gluten-free bread crumbs are a solid option as well. 

Fresh Parsley: Use fresh basil, or even dried parsley if fresh herbs aren’t available.  

Eggs: Substitute with flaxseed or chia seed mixed with water (1 tablespoon of seeds + 2.5 tablespoons of water per egg) for a plant-based binder.  

Rao’s Tomato Sauce: Is Rao’s addictive, or is it just me? It tastes great and no guilt here for not making my own. Any marinara or pasta sauce of your choice should work fine. Homemade tomato sauce is also a fantastic substitute.  

Ground Beef (99% Lean): Consider ground turkey, chicken, or a meat-free alternative like plant-based ground “meat.”  I’ve made these with a combo of lean ground beef and bison and they were delicious.

Dried Oregano: Italian seasoning or herbes de Provence can provide a similar flavor profile.  

Kosher Salt: Sea salt or table salt will do the job—just adjust the quantity accordingly.  

Cracked Black Pepper: Pre-ground pepper will work, though freshly ground enhances the flavor best.  

Optional Add-ins  

  • Red pepper flakes or cayenne pepper for a spicy kick  
  • Nutritional yeast for a plant-based take  
  • Substitute ground meat for plant-based options like Impossible Burger or Beyond Meat  

💡 Gluten-Free? Read This!  

If you’re steering clear of gluten, it’s easy to adapt this recipe. Replace the sourdough or bread crumbs with gluten-free options like gluten free bread, oat flour, canned lentils, or crushed gluten-free crackers. The rest of the ingredients—like fresh herbs, garlic powder, and onion powder—deliver bold flavor without compromise.  

Gluten has been bothering me lately, but if I use my own homemade sourdough in this recipe, I seem to tolerate it well. May be worth a shot.

👩🏻‍🍳 How to Make My Easy Messless Meatballs  

Preheat the Oven: Set to 450°F to achieve thorough browning. Line a large skillet or baking sheet with parchment paper.  

Prep the Binder: Using a food processor, combine parmesan cheese, bread crumbs, garlic, onion, parsley, eggs, and tomato sauce. Blend until the mixture is smooth with small flecks throughout.  

Mix the Meat: Add the processed mixture to a large mixing bowl with ground beef, dried oregano, Kosher salt, and black pepper. Gently incorporate until evenly combined, forming the meat mixture.

Shape the Meatballs: Use a small ice cream scoop to measure portions. Roll lightly in your hands to form round balls and place them onto the prepared sheet pan. Add a drizzle of little oil (like olive oil) on top for extra fat flavor.  

Bake: Bake for 15-20 minutes or until the meatballs are golden brown and just cooked through. For larger meatballs, allow a few further minutes of cooking time.  

Serve: Pair with additional sauce or enjoy as is for the perfect no-mess dinner.  

Jump to Recipe

📓 Best Served With  

These meatballs are incredibly versatile and work with almost any hearty meal. Here are some pairing ideas to try next time!  

  • Classic spaghetti squash or pasta with marinara sauce.  
  • Meatball subs topped with mozzarella cheese.  
  • Serve over creamy polenta or alongside a fresh salad.  
  • Enjoy them solo with a small bowl of red sauce for dipping.  

👝 How to Store Leftovers  

To keep your messless meatballs fresh, follow these tips:  

Refrigerator: Place cooled meatballs in an airtight container and store for up to 4 days.  

Freezer: Freeze them in a freezer bag for up to 3 months. Reheat in the oven for that just-baked texture.  

Next Day Tip: Warm leftovers in beef broth to keep them juicy!  

🧠 Common Questions  

Can I Make These Vegetarian?  

Absolutely! Try swapping ground beef with canned lentils, meatless alternatives like an Impossible Burger, and use flax egg and nutritional yeast instead of eggs and cheese. 

What Size Should I Make the Meatballs?  

I recommend using a small ice cream scoop for uniform sizing. This ensures even cooking and perfect round balls every time!  

How Can I Add More Flavor?  

Boost the flavors of Italian-American meatballs by adding soy sauce, tomato paste, or sautéed onion to the meat mixture. You can also experiment with fresh herbs or a pinch of cayenne pepper for a twist.  

Join my next 6 week challenge!

Tired of endless diets and no results? Join the FASTer Way to Fat Loss and see real, sustainable changes in just 6 weeks!

Melanie Marcus FASTer Way to Fat Loss Coach

💪🏻 Tracking Macros? Check This Out  

If you are tracking macros, these messless meatballs are on point. With 99% lean ground beef, fresh parsley, and whole food ingredients, they’re lower in fat without sacrificing flavor. Pair them with spaghetti squash for a well-rounded, macro-friendly meal. Check the nutritional information below to plan your plate accordingly.  

I personally love having these on my low carb days but the macros stack up well for regular macro days too!

If you try these – and I hope you do – you have to let me know what you think! Leave a comment below or DM me on social!

Messless Meatballs

Prep Time 10 minutes
Course Main Course
Servings 8
Calories 216 kcal

Ingredients
  

  • ½ cup parmesan cheese diced
  • 1 small onion roughly chopped
  • 4 cloves garlic
  • 1 cup stale sourdough or breadcrumbs
  • ¼ cup fresh parsley
  • 2 large eggs
  • cup Raos tomato sauce
  • 2 lb. ground beef 99% lean
  • ½ teaspoon dried oregano
  • 2 teaspoons Kosher salt
  • ½ teaspoon cracked pepper

Instructions
 

  • Preheat oven to 450 degrees F.
  • In a food processor, combine the cheese, bread, onion, garlic, parsley, egg, and sauce. Blend for 30 seconds, scraping the sides as needed.
  • In a large bowl, combine ground beef, oregano, salt and pepper.
  • Add the cheese/breadcrumb/sauce mixture and gently but thoroughly combine.
  • Using a small ice cream scoop, measure out the meatballs and roll gently in hands to shape into a ball. Place onto prepared sheet pan. Drizzle tops lightly with oil.
  • Bake for 15-20 minutes, or until browned and just cooked through.
  • Serve with or without additional sauce.

Nutrition

Calories: 216kcalCarbohydrates: 5gProtein: 29gFat: 8gSaturated Fat: 4gPolyunsaturated Fat: 1gMonounsaturated Fat: 3gTrans Fat: 0.4gCholesterol: 115mgSodium: 843mgPotassium: 486mgFiber: 1gSugar: 1gVitamin A: 313IUVitamin C: 5mgCalcium: 104mgIron: 3mg
Tried this recipe?Let us know how it was!

Gingerbread Cookies (GF + Vegan)

These Easy Gluten-Free Gingerbread Cookies are my go-to for the holiday season because they are so simple to make … and it doesn’t hurt that they are absolutely delicious. Whether you’re turning them into festive gingerbread men, a gingerbread house, or just classic gingerbread squares, this recipe is worth a try. And the bonus? It’s gluten-free and vegan-friendly, making it the perfect treat for literally everyone. Personally I love that they have a little crunch, so I take care to cut scraps into small squares for a bite sized treat 🙂

This blog may include affiliate links from which I receive a small commission.  

Jump to Recipe
  • Perfect Texture: These cookies have a great crunch and hold their shape for decorating.  
  • Diet-Friendly: Made with a gluten-free flour blend, vegan butter, and mashed banana, this recipe is perfect for those with dietary restrictions.  
  • Festively Delicious: Packed with gingerbread spice, ground ginger, and a hint of blackstrap molasses, these cookies taste like classic gingerbread cookies.  
  • Fun for the Family: Roll out the dough, grab your cookie cutters, and get decorating with your favorite royal icing. It’s a fun activity for the entire family!  
Jump to Recipe

🗒️ Ingredients + Substitutions  

Gather these ingredients to create baking magic with options for substitutions!  

  • Gluten-Free Flour Blend (like Bob’s Red Mill): all-purpose flour can be used
  • Sugar or Coconut Sugar for a deeper flavor.  
  • Ground Ginger and 1 tsp Ground Cinnamon for that signature gingerbread spice. Add a pinch of ground cloves if desired!  
  • Vegan Butter or Coconut Oil, softened.  
  • Blackstrap Molasses: Essential for that rich gingerbread flavor! Golden syrup or maple syrup could work too.  
  • Mashed Banana: Acts as a binder; you can substitute with applesauce if needed.  
  • Sea Salt to balance the flavors.  

💡 Gluten-Free? Read This!  

When it comes to gluten-free baking, preparation is key for the best results.  

  • Use a high-quality gluten-free flour blend (like Bob’s Red Mill) that contains xanthan gum or add it separately (1 tsp per 2 cups of flour). This acts as a leavening agent to give your dough structure.  
  • Look for fine-ground flours like oat flour, rice flour, or almond meal for smoother results.  
  • Measure accurately using a measuring cup and avoid packing the flour.  

👩‍🍳 How to Make My Easy Gluten-Free Gingerbread Cookies  

Prep Steps  

  • Measure out all the dry ingredients to keep your baking organized.  
  • Have your tools ready, including a large bowl, medium bowl, rolling pin, and cookie cutters.  

Make the Dough  

Mix the Dry Ingredients  

    • In a large mixing bowl, whisk 1 ¾ cup gluten-free flour blend, 1 tsp ground ginger, 1 tsp cinnamon, and ½ tsp sea salt.  

    Cream the Wet Ingredients  

      • Using a stand mixer or medium bowl, beat together ½ cup softened vegan butter and ¾ cup sugar until fluffy.  Be sure to push down the batter from the sides of the bowl half way through.  
      • Add ¼ cup blackstrap molasses and ⅓ cup mashed banana, blending until smooth.  

      Combine Wet and Dry  

        • Slowly add the dry ingredients to the wet mixture. Mix until a sticky dough forms. Wrap the gingerbread dough tightly with plastic wrap and chill in the fridge for 30 minutes.  

        Roll, Cut, and Bake  

        1. Remove the gingerbread cookie dough from the fridge and roll it out on a lightly floured surface to ¼ inch thick. Use scraps to re-roll and cut shapes until all dough is used.  
        2. Transfer to Prepared Baking Sheets lined with parchment paper. Chill again while preheating the oven to 350°F.  
        3. Bake for 12–14 minutes, or until slightly puffy. Cool on a cooling rack for at least 15 minutes before decorating.  

        📓 Best Served With  

        Pair these cookies with a steaming cup of hot cocoa, a pumpkin spice latte, or even mulled wine for cozy holiday vibes. They’re also perfect for building a gingerbread house or sharing as gifts with friends.  

        👝 How to Store Leftovers  

        Keep your baked cookies fresh by storing them in an airtight container at room temperature for up to 2 weeks. They can also be frozen for up to a month. Feel free to store leftover dough scraps the same way for your next baking session!  

        Join my next 6 week challenge!

        Tired of endless diets and no results? Join the FASTer Way to Fat Loss and see real, sustainable changes in just 6 weeks!

        Melanie Marcus FASTer Way to Fat Loss Coach

        🧠 Common Questions  

        Can I make these ahead of time?  

        Absolutely! Prepare the dough in advance and wrap it in plastic wrap. It will keep in the fridge for 2-3 days or up to 3 months in the freezer.  

        Can I use almond or oat flour instead of a gluten-free flour blend?  

        For best results, stick with a gluten-free blend. 

        How can I decorate these cookies?  

        Use royal icing made with meringue powder and powdered sugar for intricate details. For simpler decoration, drizzle with melted chocolate or top with coconut shreds and sprinkles.  I kept it easy by using pre made icing from Harris Teeter.

        💪🏼 Tracking Macros? Check This Out  

        This recipe is proof that treats can be enjoyed while staying mindful. This recipe is made with whole food ingredients, it displaces a bit of sugar and fat by using bananas and it’s still super fun.  Each cookie has approximately 120 calories, and the added benefit of using dairy-free butter and coconut sugar makes them lighter than their traditional counterparts. These check the box for a better for you treat day.  

        If you make this recipe – AND I HOPE YOU DO –  Share your creations on Instagram using #missnutritiouseats, I’d love to see what you made! Check out the full recipe card below for all the details.  

        Happy baking 🎅🏼🍪!

        Gingerbread Cookies (Vegan + GF)

        Course Dessert
        Servings 12
        Calories 197 kcal

        Ingredients
          

        • 1 ¾ cup Gluten-Free Flour Blend like Bob’s Red Mill
        • ¾ cup Sugar
        • 1 tsp Ground Ginger
        • 1 tsp Ground Cinnamon
        • ½ cup Vegan Butter softened
        • ¼ cup Molasses
        • cup Mashed Banana
        • ½ tsp Sea Salt

        Instructions
         

        • In a large mixing bowl, whisk 1 ¾ cup gluten-free flour blend, 1 tsp ground ginger, 1 tsp cinnamon, and ½ tsp sea salt.
        • Using a stand mixer or medium bowl, beat together ½ cup softened vegan butter and ¾ cup sugar until fluffy.
        • Add ¼ cup blackstrap molasses and ⅓ cup mashed banana, blending until smooth.
        • Slowly add the dry ingredients to the wet mixture. Mix until a sticky dough forms. Wrap the dough tightly with plastic wrap and chill in the fridge for 30 minutes.
        • Remove the gingerbread cookie dough from the fridge and roll it out on a lightly floured surface to ¼ inch thick. Use scraps to re-roll and cut shapes until all dough is used.
        • Transfer to Prepared Baking Sheets lined with parchment paper or cookie sheets. Chill again while preheating the oven to 350°F.
        • Bake for 12–14 minutes, or until slightly puffy. Cool on a cooling rack for at least 15 minutes before decorating.

        Nutrition

        Calories: 197kcalCarbohydrates: 32gProtein: 2gFat: 8gSaturated Fat: 1gPolyunsaturated Fat: 2gMonounsaturated Fat: 4gTrans Fat: 1gSodium: 158mgPotassium: 130mgFiber: 2gSugar: 19gVitamin A: 5IUVitamin C: 1mgCalcium: 29mgIron: 1mg
        Tried this recipe?Let us know how it was!

        Quick Savory Oatmeal with egg whites (GF + Protein)

        If you’ve only been enjoying oats the sweet way—with maple syrup, brown sugar, and fresh fruit—then it’s time to mix things up. As a registered dietitian, I went through a pretty heavy oatmeal phase.  I was living alone and trying to make the most of my staple ingredients.  That’s where this savory oats recipe was born.  

        Savory oats are a great way to elevate your breakfast game while packing in essential nutrients like fiber, protein, and micronutrients. Whether you’re looking for a nutritious breakfast or an easy meal for your busy mornings, this savory dish hits all the right notes. It’s loaded with rolled oats, egg whites, and baby spinach, making it perfect for anyone who love a good quick and savory breakfast. Plus, with so many savory toppings options, you’ll never get bored! 

        Jump to Recipe

        😍 Why You’ll Love This Savory Oatmeal Recipe

        Packed with Nutrition: This bowl of oatmeal is high in fiber content, lean protein, and healthy fats to keep your blood sugar stable and your energy levels high throughout the day.  

        Warm and Versatile: Perfect for cold weather or busy weekday mornings, you can customize it with your favorite toppings like parmesan cheese, runny eggs, and garlicky greens.

        Quick and Easy: Whether you’re using quick oats, regular steel-cut oats, or quick-cooking steel-cut oats, it’s simple to prepare no matter how busy your schedule.

        Burst of Flavor: The inclusion of nutritional yeast, or dash of soy sauce, and sesame oil adds a delightful nutty flavor and next-level umami.

        Jump to Recipe

        🗒️ Ingredients + Substitutions

        Here’s everything you’ll need to make this savory oatmeal bowl:

        • 1/2 cup rolled oats (or substitute with steel-cut oats or ancient grains like brown rice)  
        • 1/2 cup egg whites for lean protein (swap with a jammy egg, poached egg, or soft-boiled egg for variety)  
        • 1 bag frozen spinach for essential micronutrients (can substitute with fresh baby spinach, broccoli, kale or collards as long as they’re cooked down)  
        • 1-2 tbsp nutritional yeast for cheesy flavor and nutrients.  Garlic powder would be good here too.  
        • Optional savory toppings like parmesan cheese, feta cheese, cheddar cheese, green onions, sun-dried tomatoes, bacon bits, or a drizzle of olive oil  
        • I make these with a splash of water, but vegetable broth, or chicken stock could be used to cook the oats.
        • Seasoning like garlic powder, kosher salt, and black pepper  

        Optional flavor boosters include white miso, chili oil, or red miso.

        Jump to Recipe

        💡 Gluten-Free? Read This!

        Good news! If you’re using certified gluten-free oats, this recipe is naturally gluten-free. Just double-check that any broth or toppings, such as miso or soy sauce if you are using to ensure they are also gluten-free.

        👩‍🍳 How to Make My Savory Oatmeal Recipe

        Step 1: Cook the Base  

        • To keep it quick I cook the oats in a microwaveable bowl.  But you could also heat a medium saucepan over medium-high heat. Add your oats, water, vegetable broth, or chicken broth. Bring to a simmer and stir occasionally until the cooked oats become creamy.  

        Step 2: Add the Egg Whites  

        • Reduce to medium heat, and slowly pour in the egg whites, stirring constantly to create a fluffy texture.  

        Step 3: Add the Spinach  

        • Heat the bag of frozen spinach (or fresh spinach) and cook until it wilts completely.  Remove any excess oil.  

        Step 4: Enhance the Flavor  

        • Stir in nutritional yeast, garlic powder if using, a small amount of dry bouillon, and a pinch of kosher salt for added depth.  

        Step 5: Top It Off  

        • Transfer the oats to a bowl of oats and garnish with your favorite toppings. For added protein and fats you could add a fried egg, runny yolk, or some caramelized onions for extra richness. Hot sauce would be good for an extra kick.  

        📓 Best Served With

        • A side of sweet potatoes or freshly roasted cherry tomatoes for extra nutrients.  
        • Pair it with a cup of cold brew coffee or green tea for the ultimate savory breakfast.

        👝 How to Store Leftovers

        Have leftovers? No problem!  

        • Store your oats in an airtight container in the fridge for up to 3 days.  
        • Reheat with a splash of water or broth in a small skillet over medium heat to regain the creamy consistency.
        • Most of the time, I’m making this as a single serve, so there are no leftovers! 😆

        🧠 Common Questions

        Can I make this recipe vegan?    

        Absolutely! Simply swap the egg whites with a plant-based option like silken tofu or skip them entirely.  

        What’s the best type of oats for savory dishes?    

        Both rolled oats and steel-cut oats work great, but quick-cooking oats are perfect for busy mornings.  If you have steel cut oats already cooked, this would be a great way to layer them.  Just be sure to prepare them with water.  It may taste a little odd if you use dairy.  

        Can I meal-prep this?  

        Yes! Make a big batch of the oatmeal base (without toppings) and portion it into meal prep containers. Add your toppings when you’re ready to eat.

        💪🏼 Tracking Macros? Check this out

        This bowl of oatmeal is a powerhouse of nutrients:

        • Carbs for energy from the whole grain oats  
        • Lean protein from egg whites and nutritional yeast  
        • Micronutrients from baby spinach  

        Plus, it’s low in saturated fat, making it a great option for anyone watching their macros.

        Start your day right with this savory oatmeal recipe—a healthy breakfast idea that proves oats aren’t just for sweet dishes. Experiment with new recipes and top your savory oatmeal bowls with creative combinations you find at the grocery store. Whether it’s your first time making savory oatmeal or you’re an experienced oat lover, this recipe will quickly become your go-to for a quick and delicious breakfast!

        Savory Spinach Oats

        Cook Time 10 minutes
        Course Breakfast, Main Course
        Cuisine American
        Servings 1
        Calories 273 kcal

        Equipment

        • microwave

        Ingredients
          

        • 1/2 cup rolled oats
        • 1/2 cup egg whites
        • 1 bag frozen spinach about 2 cups
        • 2 tbsp nutritional yeast
        • 1/2 tsp seasonello

        Instructions
         

        • Cook oats in microwave according to package directions.
          Then add egg whites, mix well and cook additional 90 seconds.
        • Cook spinach in microwave and remove excess water.
        • Layer spinach on the bottom of large bowl. Sprinkle nutrition yeast on top.
        • Top with cooked oats and seasonello and pepper as desired.

        Nutrition

        Calories: 273kcalCarbohydrates: 35gProtein: 26gFat: 3gSaturated Fat: 0.5gPolyunsaturated Fat: 1gMonounsaturated Fat: 1gSodium: 1368mgPotassium: 649mgFiber: 8gSugar: 1gVitamin A: 117IUVitamin C: 0.1mgCalcium: 32mgIron: 3mg
        Tried this recipe?Let us know how it was!

        Addictive Mint Chocolate Chip Protein Shake 

        Mint chocolate chip is my favorite ice cream flavor – but it has to be the green kind 😉.  I will however, make an exception for this smoothie. I found a sugar free version of Torani Mint Chocolate Chip syrup while walking through Home Goods and decided to take a chance. I usually have a protein shake (in ice cream form with extra ice and a frozen banana), so I thought I could experiment with this syrup.  And let me tell you – it hits the spot.  The mint isn’t too overpowering and it 1000% tastes like green mint chocolate chip ice cream. Plus my husband refused to share it with me after assuming it wasn’t healthy. So you’re welcome. This is your new guilt-free way to satisfy your sweet tooth —the Mint Chocolate Chip Smoothie! Packed with 20g of protein, this indulgent yet healthy smoothie feels like dessert in a glass PLUS it will support your health goals, especially weight loss. Whether you crave a post-workout recovery snack or a night time TV treat, this recipe checks all the boxes.  

        As I write this, we could totally make it a green smoothie by adding a handful of baby spinach.  …for the green mint chocolate chip sticklers out there.  

        Jump to Recipe

        😍 Why You’ll Love my Mint Chocolate Chip Smoothie  

        • It tastes like mint chocolate chip ice cream without the added sugars.  
        • It’s perfect for weight loss, thanks to its high protein content and satisfying nature.   
        • The creamy texture will remind you of a shamrock shake but without the guilt—ideal for a St. Patrick’s Day treat or any single day!  
        • With potential to add healthy ingredients like fresh mint leaves, cacao nibs, and almond milk to nourish your body. 
        • There’s zero compromise on flavor while keeping it low in added sugars.  
        Jump to Recipe
        Jump to Recipe

        🗒️ Ingredients + Substitutions  

        Here’s everything you need to whip up your Mint Chocolate Chip Smoothie. Substitute freely depending on dietary needs or preferences!  

        • FASTer Way Vanilla Protein Powder 🌟 (Swap for chocolate protein powder or vegan protein powder as needed.)  
        • Unsweetened Almond Milk (Or use coconut milk for a richer taste, just note calories will need to be adjusted).  
        • Sugar-Free Mint Chocolate Chip Syrup (I use Torani) (Peppermint extract will work, but adjust for sweetness.).  
        • Xanthan Gum (For a thicker, ice-cream-like consistency.).  
        • Vanilla Extract (Adds incredible flavor, but optional.).  
        • Sea Salt (A pinch enhances those chocolatey notes!).  
        • Ice (Essential for that frosty, creamy texture.).  
        • Mini Chocolate Chips or Cacao Nibs (Go for dark chocolate chips for extra nutrition.).  

        💡 Gluten-Free? Read This!  

        Great news for gluten-free folks—this recipe is naturally gluten-free, provided all your ingredients (like the protein powder or artificial flavors) are certified gluten-free. Always check labels when you’re at the grocery store!  

        👩‍🍳 How to Make My Mint Chocolate Chip Smoothie  

        1️⃣ Add all ingredients (except the chocolate chips) into a blender. Pro tip? Toss in a frozen banana to create an even creamier texture if it fits your daily diet.  

        2️⃣ Blend on high until smooth. Adjust the mix with more ice or almond milk depending on how thick you like your shake.  

        3️⃣ Sprinkle in your mini chocolate chips or cacao nibs, and blend lightly for a chocolate chip protein smoothie effect.  

        4️⃣ Pour into your favorite glass, garnish with fresh mint leaves, and enjoy!  

        📓 Best Served With  

        Turn this smoothie into a meal or a snack by pairing it with a slice of whole-grain toast, and nut butter for added healthy fats or sprinkle in chia seeds or flax seeds for additional omega-3s.

        👝 How to Store Leftovers  

        If you can’t finish it all, pour any leftovers into an airtight container and store in the fridge for up to one day. Alternatively, pour it into popsicle molds and freeze for a fun, healthy snack!  

        🧠 Common Questions  

        Can I make this vegan?  

        Absolutely! Substitute the whey protein with a vegan protein powder and swap coconut milk or almond milk for any plant-based option you love.  

        Is this better than a mint chocolate chip milkshake?  

        Yes! You get the same indulgent, delicious flavor as a classic milkshake but with extra protein, fewer calories, and better nutrition facts to fit into your daily macros.  

        Can I drink this every day?  

        Totally! Incorporate it into your daily diet for an amazing post-workout snack or an easy way to curb your sweet tooth.

        Join my next 6 week challenge!

        Tired of endless diets and no results? Join the FASTer Way to Fat Loss and see real, sustainable changes in just 6 weeks!

        Melanie Marcus FASTer Way to Fat Loss Coach

        💪🏼 Tracking Macros? Check This Out  

        This smoothie packs a protein punch with 20g of protein while keeping your sugar intake low. Here’s a breakdown to fit it into your nutrition plan:

        • Protein – 21 g protein From the FASTer Way Vanilla Protein Powder.  
        • Carbs – Balanced with unsweetened almond milk and frozen banana.  If it’s a low carb day, omit the banana and replace with ice cubes for thickness.
        • Fats – Enhanced by dark chocolate chips or nut butter as garnish.  

        This chocolate mint protein shake not only zaps your sweet tooth but also supports weight loss with clean energy and healthy ingredients.  

        Top view of mint chocolate ice cream with cocoa and mint leaves.

        Mint Chocolate Chip Shake (Protein)

        Prep Time 5 minutes
        Course Dessert, Snack
        Cuisine American
        Servings 1
        Calories 197 kcal

        Equipment

        • blender

        Ingredients
          

        • 1 scoop Vanilla Protein Powder 20g protein
        • 1 each banana frozen
        • 2 tbsp mint chocolate chip syrup sugar free
        • 1 cup unsweetened almond milk
        • 1/4 tsp xanthan gum
        • 1/4 tsp sea salt
        • 1/2 tsp vanilla extract
        • 1/2 cup ice to thicken
        • 1/2 tbsp mini chocolate chips

        Instructions
         

        • Add everything to blender except chocolate and blend until smooth.
        • Top with mini chocolate chips and enjoy.

        Nutrition

        Calories: 197kcalCarbohydrates: 13gProtein: 21gFat: 7gSaturated Fat: 2gPolyunsaturated Fat: 2gMonounsaturated Fat: 2gTrans Fat: 0.01gCholesterol: 63mgSodium: 1016mgPotassium: 132mgFiber: 2gSugar: 7gVitamin A: 17IUVitamin C: 0.1mgCalcium: 467mgIron: 0.1mg
        Keyword Shake
        Tried this recipe?Let us know how it was!

        Pumpkin Pie Smoothie Recipe (High Protein + GF)

        Is your pumpkin spice latte messing with your diet? If you’ve got this Starbucks seasonal favorite on repeat, it may be! Instead, try this tasty, high-protein pumpkin treat. I promise, you’ll get your fix! It’s just as indulgent as a slice of pumpkin pie but loaded with health perks. This  Pumpkin Pie Protein Smoothie is the perfect way to satisfy those fall cravings while keeping up with your macros and protein needs.  

        Jump to Recipe

        It’s got it all—a creamy texture, cozy spices, and simple ingredients your taste buds will adore. Plus, it’s gluten-free and packed with vitamins and minerals like vitamin A, vitamin C, and some healthy fats.

        😍 Why You’ll Love the Pumpkin Pie Protein Smoothie  

        • High in Protein: With a scoop of your favorite vanilla protein powder (plant-based or whey), this smoothie is a fantastic way to meet your daily protein goals. 
        • Immune-Boosting Ingredients: Pumpkin and warm spices like cinnamon and nutmeg are packed with antioxidants to support your immune system during cold-weather months.  
        • Simple and Flexible Ingredients: Perfect for using pantry staples like canned pumpkin (or leftover pumpkin purée) and unsweetened almond milk or oat milk.  
        • Fall in a Glass: The pumpkin spice flavor combined with natural sweetness from pumpkin and spices will give you all the cozy, fall vibes without artificial flavors or gellan gum.  
        • Fast and Easy: You’ll need just five minutes, a high-speed blender, and eight simple ingredients!  
        Jump to Recipe

        🗒️ Ingredients  & substituions

        Here’s what you’ll need to create this pumpkin pie protein smoothie masterpiece:  

        • 1 scoop vanilla protein powder—Plant-based protein powder or whey works great! I use the FW Vanilla Grass Fed protein for this.  It’s got 20g protein per scoop.   
        • 1/2 cup canned pumpkin (not pumpkin pie filling)—Ensure it’s pure pumpkin purée for that natural sweetness and health benefits. I feel like Libby’s has the best flavor. I’ve tried others that seem too bitter, or watery.
        • 1/2 cup unsweetened almond milk (or any non-dairy milk like oat milk, coconut milk, or cashew milk—your choice!)  I use Kirkland brand with just 30 calories per cup.  
        • 1/4 tsp ground cinnamon  
        • 1/4 tsp ground nutmeg  
        • 1/4 tsp ground ginger  
        • 1 tsp vanilla extract—To amplify that pumpkin spice flavor.  
        • Ice cubes (optional)—For a thicker, frostier smoothie.  

        Optional Add-ins  

        • Dash of pumpkin pie spice for extra pumpkin shake flavor.  
        • Frozen banana for creaminess and natural sweetness.  
        • Chia seeds or flax seed meal for healthy fats and fiber.  
        • Greek yogurt for even more protein and a tangy twist.  
        • Peanut butter or almond butter to add richness and essential amino acids.
        • Granola for that pumpkin pie crust texture! 

        💡 Gluten-Free? Read This!  

        This recipe is completely gluten-free if you ensure your protein powder is certified gluten-free and you skip add-ins like granola that may have gluten. Always check the packaging for cross-contamination warnings when purchasing your ingredients.  

        👩‍🍳 How to Make My Pumpkin Pie Protein Smoothie  

        Making this healthy, pumpkin-packed smoothie is super simple. Here’s the step-by-step guide to get it just right every time:

        1. Gather Your Ingredients: Start by gathering everything listed above (including optional add-ins if you’d like).  
        2. Blend: Add the vanilla protein powder, canned pumpkin, almond milk (or milk of choice), cinnamon, nutmeg, ginger, and vanilla extract into a high-powered blender. Blend on high until smooth and creamy.  
        3. Adjust Thickness: For a thicker consistency, toss in a few ice cubes and blend again. If it’s too thick, add a splash of almond milk.  
        4. Serve: Pour into your favorite glass or serving container (bonus points if it’s autumn-themed!) and sprinkle with a dash of pumpkin pie spice for garnish.  
        5. Enjoy: Sip, savor, and fall in love with your new favorite fall drink!  

        📓 Best Served With  

        Pair your pumpkin pie protein smoothie with these great options for an extra-special treat:

        • A slice of warm whole grain toast topped with almond butter and chia seeds.  
        • Pumpkin spice energy bites or cranberry bars for a double hit of fall flavors.  
        • A tall glass of water for post-workout hydration.  

        👝 How to Store Leftovers  

        Though this pumpkin shake is best enjoyed fresh, you can store leftovers in an airtight container in the fridge for up to 24 hours. If you prefer, freeze the smoothie in silicone ice cube trays. When you’re ready to enjoy, just re-blend the frozen cubes with a splash of almond milk for the same creamy texture.  

        Join my next 6 week challenge!

        Tired of endless diets and no results? Join the FASTer Way to Fat Loss and see real, sustainable changes in just 6 weeks!

        Melanie Marcus FASTer Way to Fat Loss Coach

        🧠 Common Questions  

        Can I make this smoothie dairy-free?  

        Absolutely! Use non-dairy milk like almond milk, cashew milk, oat milk, or coconut milk, and opt for a plant-based protein powder to keep it dairy-free and vegan.  

        What’s the nutritional value?  

        This pumpkin protein smoothie is packed with grams of protein, healthy fats, and essential vitamins like vitamin A, vitamin C, and vitamin D. It’s a perfect breakfast or meal replacement option for anyone looking to up their general nutrition advice game.  

        Is canned pumpkin the same as pumpkin pie filling?  

        No! Pumpkin pie filling is sweetened and pre-spiced, while canned pumpkin (or pumpkin purée) has no added sugar or artificial flavors. Opt for pure pumpkin for this recipe.  

        Can I use leftover pumpkin purée?  

        Definitely! This recipe is a great way to use up leftover pumpkin puree.  I’m usually making my kids pumpkin parfaits, with vanilla yogurt, so I usually have a can in the fridge.

        🍂 Fall in Love with This Pumpkin Pie Protein Smoothie  

        If you’re a fan of smoothies, pumpkin spice lattes, or all things pumpkin, this is the perfect breakfast or pre-workout boost for you. Packed with protein, healthy ingredients, and warm spice blend vibes, this pumpkin protein shake is sure to become a fall staple in your daily diet.  

        If you try this smoothie – and I hope you do – leave a rating and let me know what you think!  

        Pumpkin Pie Smoothie

        Prep Time 5 minutes
        Course Breakfast, Drinks, Snack
        Servings 1
        Calories 164 kcal

        Ingredients
          

        • 1 scoop vanilla protein powder 20g protein
        • 1/2 cup canned pumpkin not pumpkin pie filling
        • 1/2 cup unsweetened almond milk or milk of choice
        • 1/4 tsp ground cinnamon
        • 1/4 tsp ground nutmeg
        • 1/4 tsp ground ginger
        • 1 tsp vanilla extract
        • Ice cubes optional, for thickness

        Instructions
         

        • In a blender, combine the protein powder, canned pumpkin, almond milk, cinnamon, nutmeg, ginger, and vanilla extract.
        • Blend until smooth.
        • If you’d like a thicker consistency, add ice cubes and blend again.
        • Pour into a glass and enjoy.

        Nutrition

        Calories: 164kcalCarbohydrates: 12gProtein: 22gFat: 2gSaturated Fat: 0.3gPolyunsaturated Fat: 1gMonounsaturated Fat: 1gSodium: 169mgPotassium: 269mgFiber: 4gSugar: 5gVitamin A: 19067IUVitamin C: 5mgCalcium: 189mgIron: 2mg
        Tried this recipe?Let us know how it was!

        The best mini pumpkin cheesecakes (low carb + GF)

        If you’re on the lookout for a dessert that hits all the right notes—delicious, comforting, and kind to your macros—then you’re going to love this recipe. It’s a cozy, pumpkin-spiced treat that satisfies your cravings without derailing your nutrition goals. Whether you’re following a low-carb or keto, this dessert has you covered. With creamy cream cheese, rich pumpkin puree, and a touch of warm spices, you get all the seasonal flavor without the excess sugar or carbs. Top it off with some fluffy whipped cream, and you’ve got yourself a treat that’s both satisfying and macro-friendly. Perfect for fall, or any time you want a sweet fix that won’t throw you off track!

        Jump to Recipe

        😍 Why You’ll Love Adorable Mini Pumpkin Cheesecakes

        These adorable mini pumpkin cheesecakes are the perfect size for a guilt-free indulgence and they’re under 100 calories!  They’re made with pure pumpkin puree and warm spices, they have a creamy pumpkin filling that everyone expects from cheesecake. Plus, they require less time to bake than a whole cheesecake, making them a quick and easy treat. 

        🗒️ Ingredients & substitutions

        • Full-fat Cream Cheese:  Greek Yogurt (full-fat) will give you a tangier flavor and slightly different texture.  Ricotta Cheese is a great alternative.  A bit less creamy but still works well in baking.  Blended Cottage Cheese will mimic the texture of cream cheese.  And of course, if you want to keep this dairy free, us a vegan cream cheese alternative!  
        • Canned Pumpkin Puree:  Butternut Squash Puree has a similar texture and flavor profile. Sweet Potato Puree will add a slightly sweeter, richer flavor.  
        • Almond Flour:  Keep it gluten free by using Coconut Flour.  You’ll use less, about 2 tablespoons, as it’s much more absorbent. If you are not worried about keeping it gluten free you can use crumbled graham crackers or ginger cookies.  
        •  Erythritol (or Sweetener of Choice):  Monk Fruit Sweetener is a great low-calorie, low-carb alternative.  Real sugar is also fine here, but it will significantly change macros!
        • Vanilla Extract: Try Almond Extract: A little goes a long way, but it pairs nicely with pumpkin.
        • Cinnamon, nutmeg, ginger and cloves create your own pumpkin pie spice.  But you can 100% just substitute an equal amount of pumpkin pie spice if you have it on hand to keep things easy!
        • Whipped Cream (for topping):  Coco whip is a nice dairy free alternative.  
        Jump to Recipe

        💡 Gluten-Free? Read This!

        This recipe is naturally gluten free, which makes it a perfect option if you’re hosting or attending a party.  

        Join my next 6 week challenge!

        Tired of endless diets and no results? Join the FASTer Way to Fat Loss and see real, sustainable changes in just 6 weeks!

        Melanie Marcus FASTer Way to Fat Loss Coach

        Why is it Considered Macro-Friendly?

        • Low in carbs: The combination of almond flour, erythritol, and pumpkin keeps this recipe low in carbs, making it suitable for low-carb, keto, diabetic-friendly diets or those that may be carb cycling.  
        • High in healthy fats: The use of full-fat cream cheese, whipped cream, and almond flour adds mostly health fats, which are essential for sustained energy, especially in low-carb or high-fat diets like keto.
        • Moderate protein: While not a high-protein recipe, it still includes ingredients like cream cheese and almond flour that provide a bit of protein to help with satiety.
        • Low sugar: Erythritol and other spices take the place of traditional sugar, significantly lowering the glycemic index and preventing blood sugar spikes.

        👩‍🍳 How to Make My Adorable Mini Pumpkin Cheesecakes

        1. Prep & Blend: Preheat your oven to 350°F. Then, in a medium mixing bowl, combine the softened cream cheese, pumpkin puree, almond flour, sweetener, vanilla extract, and spices using an electric mixer or hand mixer until smooth.  This step could also be done in a food processor or high powered blender.  
        2. Fill & Bake: Line a 12-cup muffin pan with paper liners or use a mini cheesecake pan. Scoop the cream cheese mixture into each muffin liner, pressing it down firmly with a spoon or rolling pin.
        3. Bake & Chill: Bake cheesecakes for 10-12 minutes, or until the edges are golden, and the center is set. Allow them to cool on a wire rack before transferring to the fridge for 1-2 hours to firm up.
        4. Serve: Top each mini cheesecake with a dollop of homemade whipped cream and a sprinkle of cinnamon for the best results.

        📓 Best Served With

        Pair these mini pumpkin cheesecakes with a drizzle of caramel sauce or a scoop pumpkin puree. They’re also delicious alongside pumpkin pie spice lattes for the perfect fall dessert experience.

        👝 How to Store Leftovers

        Store any leftover mini pumpkin cheesecake bites in an airtight container or wrap them individually with plastic wrap. Keep them in the refrigerator for up to 5 days for maximum freshness. If storing long-term, freeze them in a freezer-safe plastic bag and thaw before serving.

        🧠 Common Questions

        Can I use homemade pumpkin puree?  

        Absolutely! Homemade pumpkin puree can add a fresh pumpkin flavor to your cheesecakes.

        Why use room temperature ingredients?  

        Using room temperature ingredients ensures a smooth, simple mixture of cream cheese and pumpkin, preventing much air from incorporating and giving a creamy texture.

        How do I make an easy graham cracker crust?  

        For an easy graham cracker crust, combine graham cracker crumbs with melted butter and press into the bottom of each muffin cup.

        What’s the best way to avoid cracks in my cheesecakes?  

        Using a water bath or baking time adjustments can help prevent cracks, but these mini desserts are usually forgiving in that aspect.

        Pumpkin Cheesecake Bites

        Course Dessert
        Servings 12
        Calories 88 kcal

        Ingredients
          

        • 8 oz cream cheese softened
        • 1/2 cup canned pumpkin puree, not pie filling
        • 1/4 cup almond flour
        • 1/4 cup erythritol or sweetener of choice
        • 1 tsp vanilla extract
        • 1 tsp cinnamon
        • 1/4 tsp nutmeg
        • 1/4 tsp ginger
        • 1/8 tsp cloves
        • 1/4 cup unsweetened whipped cream for topping

        Instructions
         

        • Preheat the oven to 350°F (175°C). In a medium mixing bowl, combine the softened cream cheese, pumpkin puree, almond flour, erythritol, vanilla extract, and spices, mixing until smooth.
        • Scoop the mixture into silicone muffin cups or a mini muffin tin, pressing it down firmly.
        • Bake for 10-12 minutes, or until the edges are golden and the center is set.
        • Allow the bites to cool in the fridge for 1-2 hours before serving.
        • Top each bite with a dollop of whipped cream just before serving.

        Nutrition

        Calories: 88kcalCarbohydrates: 7gProtein: 2gFat: 8gSaturated Fat: 4gPolyunsaturated Fat: 0.3gMonounsaturated Fat: 2gCholesterol: 20mgSodium: 60mgPotassium: 49mgFiber: 1gSugar: 1gVitamin A: 1852IUVitamin C: 0.4mgCalcium: 29mgIron: 0.3mg
        Tried this recipe?Let us know how it was!

        Chocolate Baked Oatmeal recipe (High protein + GF)

        If you’re anything like me, planning meals in advance can save you so much stress during the week. That’s why I love making this chocolate baked oats recipe (originally from Lillie Eats and Tells) at the beginning of the week. It’s the perfect blend of taste and nutrition thanks to zucchini and mini chocolate chips and other healthy ingredients like gluten-free oats and chocolate protein powder.  And for the record, I know this will sound crazy, but I don’t even heat it up when I eat it!  I actually prefer it cold, straight out of the fridge with a splash of almond milk. 🤷🏻‍♀️

        This post may include affiliate links for which I receive a small commission.  

        Jump to Recipe

        😍 Why You’ll Love Chocolate Baked Oats

        • High Protein Content: Thanks to the chocolate protein powder and egg whites, these baked oats offer a protein boost to keep you full and satisfied. 
        • Gluten-Free: Made with gluten-free oats, these baked oats are perfect for those with gluten sensitivities.
        • Satisfaction: You may think I drank the kool-aide with this one, but I really get satisfaction with these. Similar to that of chocolate, undercooked brownies. I know!
        • Simple Ingredients: This recipe uses ingredients easily found at your local grocery store.
        • Great for Meal Prep: Prepare this dish at the beginning of the week and enjoy individual portions throughout, stored in an airtight container.

        🗒️ Ingredients

        • yellow summer squash or zucchini – this is where the bulk of the recipe comes from. Don’t worry, it won’t affect the flavor of the chocolate oats.  That’s what makes zucchini and squash such a home run for macro friendly baking!
        • liquid egg whites – you can separate whole eggs for this in a pinch.  I’ve also used half egg whites and half flax egg, just know that macros will change.  
        • almond milk – the original recipe calls for almond milk creamer, but I never have it on hand.  So I use almond milk to keep calories low and it turns out great.  
        • old fashioned oats- Use rolled oats for this to get the right texture. As with most oat recipes, you could sub in quick oats but don’t use steel cut!!
        • chocolate protein powder – I use the FASTer Way Hydrobeef protein powder. I love the way it tastes in my shakes, but it also bakes really well here too.  
        • jet black cocoa powder  – regular cocoa powder is fine too. 
        • vanilla extract 
        • baking powder
        • mini chocolate chips – these are key.  When you sprinkle them across the top they add a great texture and pop of real chocolate to each slice.  Use mini dark chocolate chips – not regular or large sized chips to keep it macro friendly.  
        Jump to Recipe

        💡Gluten-Free? Read This!

        Ensure you’re using certified gluten-free oats, whether they be quick oats, rolled oats, or steel-cut oats. Gluten-free oats are processed in facilities free from gluten contamination, making them safe for those with celiac disease or gluten sensitivity.

        I know this will sound crazy, but I don’t even heat it up when I eat it!  I actually prefer it cold, straight out of the fridge with a splash of almond milk.

        👩‍🍳 How to Make My Chocolate Baked Oats

        1. Preheat Your Oven to 350°F (175°C).
        2. Prepare the Squash by using a box grater to finely grate it.  You can use a food processor to get a smoother texture. In fact, it was recommended in the original version of this recipe, but I just cannot dirty another appliance when cooking!  
        3. In a large mixing bowl, combine the squash, egg whites, oats, milk, chocolate protein powder, cocoa powder, vanilla extract, and baking powder.
        4. Mix Well until all ingredients are fully combined.
        5. Pour into a greased 9×9 baking dish. For good measure I also line it with foil or parchment paper to make clean up easy.  Trust me, it sticks to the pan! Top with mini chocolate chips.
        6. Bake for 45-50 minutes or until the center is set. The bottoms may appear moist but will firm up as they cool.
        7. Cool to room temperature before cutting into 4 pieces.

        📓 Best served with

        Enjoy your chocolate baked oats with a drizzle of peanut butter, a pinch of salt, or a few fresh berries. Add a dollop of almond butter or cashew butter for some healthy fats and a depth of flavor. Pair with a glass of oat milk or tea for a complete, delicious breakfast.

        I top with a spray of Reddi Whip. Don’t judge!

        Join my next 6 week challenge!

        Tired of endless diets and no results? Join the FASTer Way to Fat Loss and see real, sustainable changes in just 6 weeks!

        Melanie Marcus FASTer Way to Fat Loss Coach

        👝 How to Store Leftovers

        Store leftovers in an airtight container covered with plastic wrap in the refrigerator. These oats can stay fresh for up to five days, making them perfect for meal prep. You can also freeze them for longer storage.

        🧠 Common Questions

        Can I use different types of milk?

        Yes! Feel free to use any type of milk, such as unsweetened vanilla almond milk, soy milk, or coconut milk, depending on your preference.

        What if I don’t have a food processor?

        A high-speed blender can also work well for grating the squash. Alternatively, you can grate it manually using a box grater.

        Can I make this vegan?

        Yes! Replace egg whites with flax eggs to make the recipe vegan-friendly.

        Is this recipe suitable for an air fryer?

        You can try baking individual portions in a muffin tin using an air fryer, but adjust the bake time accordingly.

        Chocolate Baked Oats (GF + high protein)

        I meal prep this one just for me <3
        Servings 4
        Calories 254 kcal

        Ingredients
          

        • 2 yellow summer squash or zucchini finely grated (520 g)
        • 1 cup liquid egg whites
        • 1 ⅓ cup old fashioned oats
        • ¼ cup Califia Farms almond milk creamer or just sub your favorite milk
        • 2 scoops FW chocolate hydrobeef protein
        • ¼ cup jet black cocoa powder
        • 2 tsp vanilla
        • 2 tsp baking powder
        • 2 Tbsp mini chocolate chips

        Instructions
         

        • Pre-heat oven to 350 degrees.
        • In a large bowl, combine your squash (no need to drain), liquid egg whites, oats, creamer, protein powder, stevia, cocoa powder, vanilla, and baking powder. Mix well and pour into a greased 9×9 pan. Sprinkle the top with 2 Tbsp mini chocolate chips and bake for 45-50 minutes or until set. The bottoms will be wet but that’s ok! It gets better as it sits in the fridge.
        • Let them cool before cutting into 6 pieces.
        • Make sure to store in the refrigerator and enjoy!

        Nutrition

        Calories: 254kcalCarbohydrates: 32gProtein: 22gFat: 5gSaturated Fat: 2gPolyunsaturated Fat: 1gMonounsaturated Fat: 1gTrans Fat: 0.01gCholesterol: 3mgSodium: 401mgPotassium: 475mgFiber: 6gSugar: 8gVitamin A: 704IUVitamin C: 18mgCalcium: 183mgIron: 3mg
        Tried this recipe?Let us know how it was!

        About Me

        I’m Melanie.

        I’m a chef, registered dietitian, foodie, wife and mom.
        If you’re looking for quick and healthy meal inspiration that serves YOU and your family well, then you’ve come to the right place!

        Melanie Marcus Selfie