Category: Kids

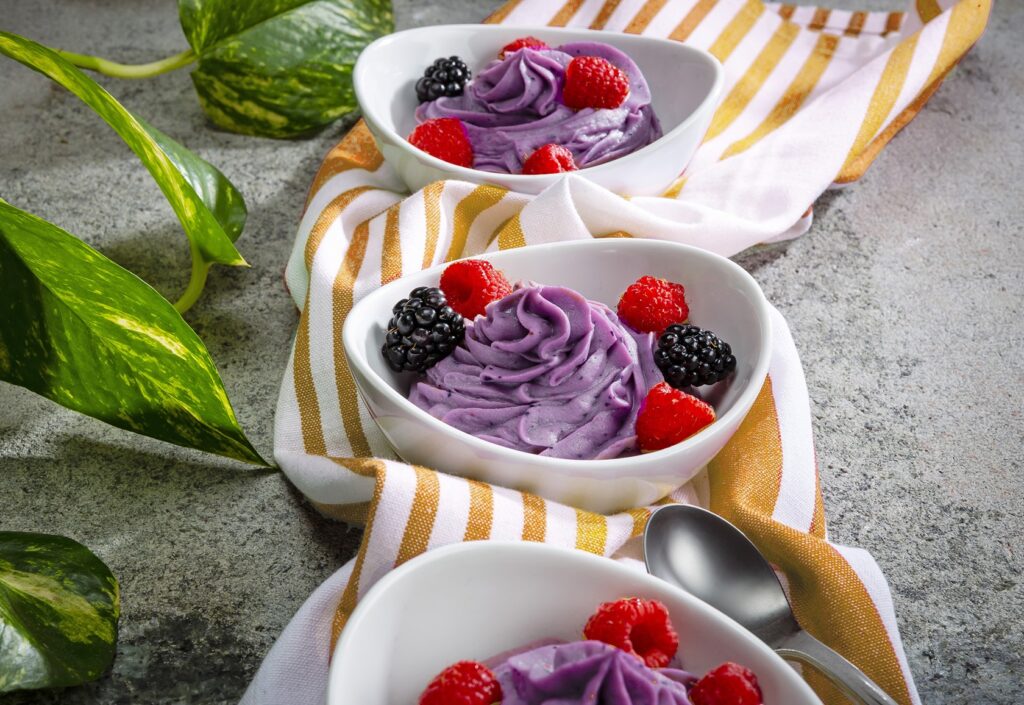
Chocolate Chia Pudding Recipe (Fat bomb + low carb)

One night after dinner, I checked my macro tracker and noticed I was off by 100g fat.  One hundred grams! It was a low carb day and I made a fatal mistake.  I ate intuitively according to my regular macros, and didn’t account for fat changes in my carb cycling!  That’s where this chia pudding was born.  I’m not into fat bombs, you know, the ones that combine peanut butter and coconut, covered in chocolate but I do like a pudding, so here is what I came up with.  

Whether you’re following a low-carb diet, the ketogenic diet, or cycling between carb-up and low-carb days, this creamy keto chocolate chia pudding is here to keep you on track. Packed with healthy fats, 12 grams of fiber, and a rich chocolate flavor, this recipe for chocolate chia pudding is an ideal way to crush your sweet craving. And if balancing your fats is a common issues, check out this post all about fat macros.

😍 Why You’ll Love This Chocolate Chia Pudding  

The main reason this low carb chia pudding stands out is versatility. It makes the perfect low carb breakfast, a perfect snack, or even a keto dessert for those days when your sweet tooth just won’t quit. Here’s why it’s so loved among keto enthusiasts and low-carb dieters alike:

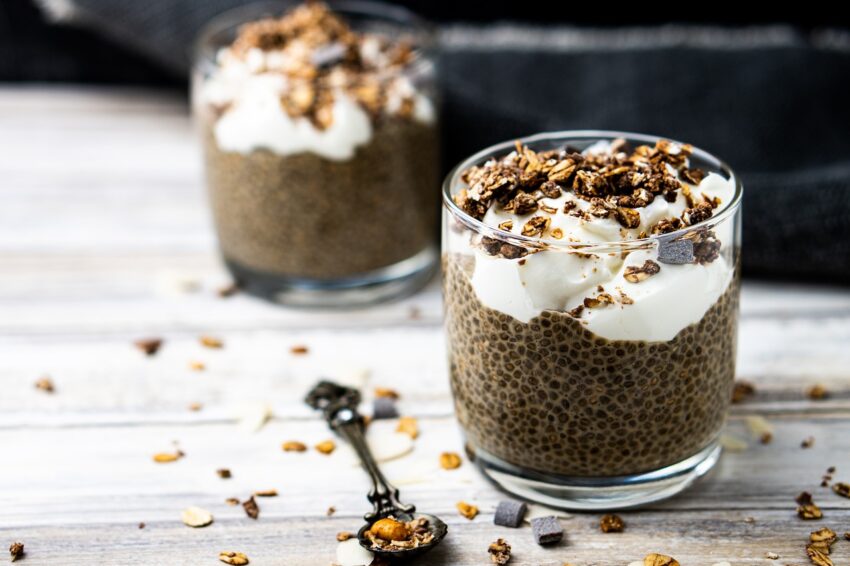
  • Rich and Creamy Texture: Thanks to full-fat coconut milk and optional toppings, this pudding mimics a decadent dessert.  
  • Loaded with Healthy Fats: Ingredients like ​chia seeds are a great source of omega-3 fatty acids and fatty acids to keep you full and satisfied.  
  • Perfect for Weight Loss Goals: High fiber and fat content help stabilize blood sugar and curb hunger, aiding in your weight loss momentum.  
  • Customizable for different flavors and textures, this base recipe can be adapted into a berry chia pudding, chocolate chia seed pudding, or even coconut chia pudding.  
  • Simple Steps = Big Results: This is an easy recipe made with whole foods, ready in under five minutes with no added sugar—you can even make it while meal prepping.  

đŸ—’ïž Ingredients + Substitutions  

Here’s what you’ll need to make this classic keto chocolate chia pudding:

  • 3/4 cup canned coconut milk:  Full-fat coconut milk helps increase total fats and offers a creamier texture.  If you don’t need as many fats, try using 2 or 4 oz coconut milk and substitute almond milk for the rest.  
  • 2 Tbsp chia seeds (can use ground chia seeds for a finer feel): These are essential for creating that magic gelatinous structure we all love.  
  • 1/2 scoop FASTer Way chocolate protein powder (or replace with unsweetened cocoa powder and a keto sweetener, like monkfruit or stevia).  
  • 1/2 tsp vanilla extract for enhanced flavor.  

Optional Toppings:

  • Mixed nuts, dusting of cacao powder, a dollop of coconut cream, or a drizzle of peanut butter or almond butter for an extra indulgent touch.

Substitutions for Personalizations:

  • Replace coconut milk with unsweetened almond milk or heavy cream for a lighter pudding with fewer total fats.  
  • For a twist on texture, top with dark chocolate shavings to enhance the chocolate pudding vibes.  

Make sure to scroll to the bottom of this post for the printable recipe card!  

Jump to Recipe

If your doctor or dietitian has suggested a heart-healthy diet, you might want to be cautious with this recipe. It’s pretty high in saturated fat, mostly from coconut, which is something to limit in these diets. While the fat gives the dish its rich, creamy texture and stays solid at room temperature, it might not fit the guidelines for heart health.

If you have questions about this, you can email me at melanie@missnutritiouseats.com

💡 Gluten-Free? Read This!  

If you’re wondering whether this recipe caters to gluten-free diets, the answer is a capital Y-E-S! All listed ingredients are naturally gluten-free, as are most low-carb sweetener .

For the best results, always cross-check any flavoring or supplement product (like protein powders) for hidden added sugar or gluten derivatives. Stick to brands with clean ingredient lists to align with your whole foods diet.  I like to use the FASTer Way Chocolate Hydrobeef protein powder which has 98 calories and 20g protein.

đŸ‘©â€đŸł How to Make My Chocolate Chia Pudding  

This creamy pudding comes together in three simple steps.  

  1. First Step: Combine the chia seeds, cocoa powder or protein powder, vanilla extract, and canned coconut milk in a mug or mason jar. 
  2. Whisk Well, no need for a food processor unless you want a smoother texture. Ensure the seeds are evenly dispersed to prevent clumps.  
  3. Refrigerate for 5-10 minutes:  Other recipes may need to Refrigerate for 4+ hours (or overnight) in an airtight container but because we’re using a thick coconut milk, this one comes together quickly.

Enjoy your low carb chocolate chia pudding cold for the best consistency.  

📓 Best Served With  

Make this the hero of your snack or breakfast with these fun pairings:

  • Top with fresh fruit like fresh blueberries or frozen strawberries for a pop of brightness.  
  • Make a berry chia pudding by layering with mixed berries once it’s firmed up.
  • Personally, I love to top with cocowhip and a handful of nuts if I have the macros.

👝 How to Store Leftovers  

This chia pudding keto recipe is perfect for meal prep! Here’s how you can store any leftovers:

  • Place pudding in an airtight container or keep individual portions in a mason jar.  
  • It lasts 5-7 days in the fridge. If your pudding thickens too much, stir in some room temperature coconut milk or unsweetened almond milk, even water to restore its creamy texture.  

🧠 Common Questions  

What are the grams of net carbs per serving?  

With 12g fiber and 22g total carbs, this pudding contains approximately 10g net carbs. Perfect for a keto dessert or snack on a low carb diet.

Are there other flavor options?  

Absolutely! This base recipe is highly versatile. Change up the protein powder flavor or omit it all together.  Add flavors like keto maple syrup, espresso shots, or crushed favorite berries for a twist.

Join my new 21 DAY reset!

Tired of endless diets and no results? This reset is for you if you want to gain energy, cut the cravings, build strength, decrease bloat and feel amazing going into the holiday season!

đŸ’ȘđŸŒ Tracking Macros? Check This Out  

Nutritional Information (per serving):  

  • 596 calories  
  • 22g total carbs  
  • 12g fiber  
  • 51g fat  
  • 21g protein  

For accuracy, use food databases to verify the nutritional values of specific brands and toppings you choose. The combination of more sweeteners or toppings may adjust macro totals.

This keto dessert is not just low-carb; it’s nourishing and loaded with nutritional benefits like omega-3s and tons of fiber, all contributing to steady blood sugar and long-lasting satiety.

Start Making Chia-based Magic  

Whether you’re on a ketogenic diet, exploring chia recipe options, or simply on a mission for flavor-packed, nutrient-dense dishes, this low carb chocolate chia pudding checks all the boxes. It’s proof that clean eating can be ultra satisfying. If you’re a chocolate lover like me- try this chocolate oats recipe. I bet you’ll love it too!

Loved this recipe or have ideas to modify it? Share your experience in our comments below or tag us on social for a chance to be featured. And don’t forget to grab your ingredient list now from the printable recipe card at the bottom of this post.  

Chocolate Chia Pudding (Low Carb)

I like this recipe for low carb days when I have a lot of fats to make up for at the end of the day!
Prep Time 8 minutes
Servings: 1
Course: Dessert
Calories: 596

Ingredients
  

  • 3/4 cup coconut milk canned, full fat
  • 1/2 scoop FW Chocolate Protein Powder 20g/scoop
  • 2 Tbsp Chia seeds
  • 1/2 tsp vanilla
  • 1 oz fancy nuts optional

Method
 

  1. Combine the first 4 ingredients in your large mug or bowl.
  2. Use a hand blender to combine everything and let firm up in the fridge for 5-10 minutes.
  3. Top with nuts before serving.

Nutrition

Calories: 596kcalCarbohydrates: 22gProtein: 21gFat: 51gSaturated Fat: 39gPolyunsaturated Fat: 6gMonounsaturated Fat: 2gTrans Fat: 0.03gCholesterol: 25mgSodium: 54mgPotassium: 619mgFiber: 12gSugar: 7gVitamin A: 53IUVitamin C: 5mgCalcium: 229mgIron: 6mg

Tried this recipe?

Let us know how it was!

How to Naturally Dye Easter Eggs with up-cycled ingredients

Easter is a special time of year known for family gatherings, egg hunts, the excitement of Easter baskets filled with goodies and of course renewed faith. But have you considered ditching the artificial colors this year for natural Easter egg dyes? It’s an excellent way to get gorgeous, sometimes subdued, sometimes vibrant colors without the chemical dyes. It’s a fantastic opportunity to involve children in a seasonal tradition of creating beautiful Easter egg colors using natural ingredients that would have otherwise been trash. Here’s my easy guide on how to do it.

a variety of colorful foods in boiling water to create dye

Growing up my aunt always colored Easter eggs using different things, but I will always remember a large stock pot filled with onion skins on her kitchen stovetop.   She even used panty hose to experiment with placing herbs or flowers to make unique designs on the eggs.  I always thought it was resourceful and beautiful.  

Materials Needed:

  • A selection of cooked white eggs and brown eggs
  • Natural dye materials: yellow onion skins, red onion skins, purple cabbage, beets, turmeric, paprkia, red zinger tea, raspberries, blueberries, spinach, black coffee
  • White vinegar or lemon juice
  • Water
  • Pots and sauce pan
  • Fine mesh strainer
  • Disposable cups or mason jars
  • Slotted spoon

Natural Dyeing Mediums to Consider

You will be amazed with how many different foods can produce a variety of colors.

Produce items

  • Red onion skin – light pink color
  • Yellow onion skin – orange color
  • Spinach – light green color
  • Raspberries – pink color
  • Purple Cabbage – blue/purple color 
  • Red Cabbage – purple color
  • Blueberries – blue color

Spices

  • Paprika – red color
  • Turmeric – yellow color

Beverages

  • Red Zinger Tea – red color
  • Coffee – blackish brown color
  • Tart Cherry Juice – red color

Remember the Ratio

One cup of medium per one cup water.  I usually do 4 cups of water so I have plenty to color several eggs at one time.  

Step 1: Prepare Your Hard-Boiled Eggs

Before you start, make sure you have plenty of hardboiled eggs in either white or brown. If you need more info on that, check out my article on the perfect hard boiled egg. Keep in mind that brown eggs will give you more muted tones when dyed while white eggs can render bright yellow, green eggs, or even blue eggs based on the natural colors you choose. 

Step 2: Create the Natural Dyes 

Natural food dyes in jars

For a true homemade dye, select the natural ingredients you want to use. Last year I experimented with a variety of produce to get different colors including  a orange dye from yellow onion skins, purple from red cabbage dye, and green dye from spinach.  

To start, place your items in large mason jars and add enough boiling hot water to cover them. For every cup of water, add the same amount of your chosen plant material and let cool completely.  This will ensure a high concentration of natural colors in the dye pot.

For spices like turmeric, mix one tablespoon of spice with a cup of water. If you’re using coffee or tea bags, brew them as you would if you were going to drink them, but in a high concentration AKA extra strong.

Step 3: Strain and Add Vinegar

Once your dye bath reaches room temperature, use a fine mesh strainer to eliminate any large pieces and pour the fluid back into mason jar. For each cup of natural dye, mix in one tablespoons of vinegar. This step is crucial as the acidity from vinegar helps the egg shells to absorb the natural colors from your homemade dye, ensuring beautiful colors.

Step 4: Dye Your Eggs

Before immersing the eggs, wrap them in various things like silk ties, old pantyhose, or rubber bands for interesting patterns. Or use  a white wax crayon to create unique designs.  Then gently lay your hard-boiled eggs into the natural egg dyes using a slotted spoon.

If you’re using hollow eggs, the process is much the same, but you may need to fill them with a little bit of water to ensure they sink. Leave the eggs in the dye bath in the fridge for a few hours or overnight for more profound depth of color. (I prefer overnight).  The good news is you can check on them occasionally to see if they’ve reached your desired color. These natural options provide various colors, from  bright yellow to blueberry’s deep blue dye.

Step 5: Drying the Eggs

Remove the eggs from the dye and set them on paper towels or a rack to dry. Resist the temptation to wipe them down, as you could rub off the natural colors. Instead, let the natural easter egg dye work its magic as the eggs dry to a wonderful sheen.

I’d love to know how your eggs turned out! Tag me on social media to share your creations!

IG: Miss_nutritious_eats

About Me

I’m Melanie.

I’m a chef, registered dietitian, foodie, wife and mom.
If you’re looking for quick and healthy meal inspiration that serves YOU and your family well, then you’ve come to the right place!

Melanie Marcus Selfie

Simple Eggless Banana Muffin Recipe (with Flax)

Muffins are on a weekly rotation in our house. Whether they’re store bought or homemade, we love them. Enjoyed with a hot cup of coffee or a tall glass of milk, does a better, more convenient go-to breakfast or snack exist? Delicious muffins are actually quite easy to whip up, and they can easily be made without eggs – and they’re super easy to batch cook! In fact, you can even make vegan muffins quite easily with just a few substitutions.

I found this recipe online several years ago, jotted it down in my kitchen notebook and have been using it ever since!

Jump to Recipe

Why would I want to make eggless muffins?

Eggs are a nutrient dense food to have in your fridge, but there are times when they’re not available. More recently, they’ve become quite expensive and are about 3x’s the price they were just a year or two ago.

There are also those with egg allergies or dietary preferences such as vegan that simply choose not to eat eggs.

Making egg-free banana muffins with a flax egg is a great way to incorporate healthy plant based fat into your diet as well. My kids don’t even know the flax is in there!

My favorite Banana Muffin Recipe

I’ve tried a lot of banana muffin recipes. Many are high in fat and refined sugars, and the “better for you versions” often flop. My favorite recipe uses a combo of apple cider vinegar and flax seed that just gives them an overall comforting flavor, especially when they come right out of the oven. I also love this recipe because I can make them in a large mixing bowl and don’t have to pull out the stand mixer!

Jump to Recipe

Ingredients you need for these quick eggless banana muffins

  • ground flaxseed
  • whole wheat flour
  • all purpose flour
  • warm water
  • cinnamon
  • nutmeg
  • baking powder
  • baking soda
  • kosher salt
  • 1% milk
  • apple cider vinegar
  • maple syrup
  • canola or grape-seed oil, any neutral oil
  • vanilla extract
  • mashed overripe bananas
  • mini chocolate chips

Additions and Substitutions

What if I don’t have apple cider vinegar?

White vinegar or lemon juice will work well too! I would not suggest using a balsamic vinegar because that flavor is quite distinct. If you don’t have any vinegar on hand, you can also leave it out.

What can I use instead of whole wheat flour?

For this recipe, I like to use a flour mixture. It helps limit the number of different flours that I have in my pantry. You could easily use a whole wheat pastry flour or a white whole wheat flour instead. Alternatively, I have used all white flour without an issue in this recipe. When I’ve used 100% all purpose flour instead of a blend, I’ve found the muffin batter was just a bit thick and needed 1/4 cup more milk.

What can I use instead of flax seed?

Use 2 eggs and omit the water instead! No problem :). Read more about the flax egg here.

What can I use instead of maple syrup?

The natural sweetness from mashed bananas is enhanced by maple syrup but you could easily use an equal amount of agave or even honey. In an absolute pinch, you could use white sugar in this recipe, but I prefer to recommend more natural sources of sweetness.

Which oil is best to use?

Almost any oil will work here. Vegetable oil, sunflower oil even olive oil will work if you like the flavor! Melted butter is traditionally used in muffins to create a fluffy texture, but we use oil instead. Because oil is a fat that is liquid at room temperature, it’s a more heart healthy alternative. Coconut oil would work in this recipe but it would increase the saturated fat and contribute a distinct flavor.

Can I leave the chocolate chips out?

Yes, but I don’t know why you’d want to! Just kidding, there is a time and place for everything. I often make them without any add ins, and they disappear just as quickly! You can also add raisins, white chocolate chips, chopped walnuts or fresh blueberries.

Can I leave out the milk?

If you don’t have milk on hand or follow a dairy free lifestyle, soy milk, oat milk or almond milk will work perfectly fine. You could also use lactose free milk, unsweetened vanilla almond milk or a light refrigerated coconut milk instead. You could also use full fat milk or even fat free milk if that is what you have on hand.

Jump to Recipe

How to make a moist eggless banana muffin

First, preheat the oven to 350F.

Next, prepare your muffin pan by lining with paper liners. If you don’t have muffin cups, spray the muffin tray with nonstick spray.

Then, combine all of the dry ingredients in a large bowl.

Combine, all of the wet ingredients in another bowl. I like to use a 4 cup measurer for this.

Then add half the dry ingredients into the wet, and mix until combined. Add the remaining dry ingredients.

Once combined, add your optional mix in’s

Pour batter in to prepared muffin tin. I like to use an ice cream scoop or 1/3 cup measuring cup to ensure they’re all the same size.

This is a good time to add more optional mix in’s to the top of the muffins! OR, skip mixing them in and just add a few for interest on top! This is what they do at the coffee shop with caster sugar. They sprinkle it on top for extra crunch!

Slide the tray onto the center rack of the oven. Be sure it’s a preheated oven!

Set timer for 20 minutes or until a toothpick comes out clean.

Let them cool down on a wire rack and store in the fridge in an airtight container for up to a week!

muffins cooling on tray

Eggless Banana Muffins

Healthy banana muffins made with flax and limited sugars
Prep Time 10 minutes
Cook Time 20 minutes
Total Time 30 minutes
Servings: 12
Course: Breakfast, Dessert, Snack

Ingredients
  

  • 4 tbsp flax seed ground
  • 4 tbsp water warm
  • 1 cup whole wheat flour
  • 3/4 cup white flour
  • 1 tsp cinnamon
  • 1/4 tsp nutmeg
  • 1 tsp baking powder
  • 1/2 tsp baking soda
  • 1/2 tsp kosher salt
  • 2/3 cup 1% milk
  • 1 tbsp apple cider vinegar
  • 1/3 cup maple syrup
  • 1/3 cup neutral oil
  • 1 tsp vanilla
  • 1 cup banana mashed
  • 1/2 cup chocolate chips or other mix ins optional

Method
 

  1. First, preheat the oven to 350F.
  2. Next, prepare your muffin pan by lining with paper liners. If you don't have muffin cups, spray the muffin tray with nonstick spray.
  3. Then, combine all of the dry ingredients in a large bowl.
  4. Combine, all of the wet ingredients in another bowl. I like to use a 4 cup measurer for this.
  5. Then add half the dry ingredients into the wet, and mix until combined. Add the remaining dry ingredients.
  6. Once combined, add your optional mix in's.
  7. Pour batter in to prepared muffin tin. I like to use an ice cream scoop or 1/3 cup measuring cup to ensure they're all the same size.
  8. This is a good time to add more optional mix in's to the top of the muffins! OR, skip mixing them in and just add a few for interest on top! This is what they do at the coffee shop with caster sugar. They sprinkle it on top for extra crunch!
  9. Slide the tray onto the center rack of the oven. Be sure it's a preheated oven!
  10. Set timer for 20 minutes or until a toothpick comes out clean.
  11. Let them cool down on a wire rack and store in the fridge in an airtight container for up to a week!

Tried this recipe?

Let us know how it was!

About Me

I’m Melanie.

I’m a chef, registered dietitian, foodie, wife and mom.
If you’re looking for quick and healthy meal inspiration that serves YOU and your family well, then you’ve come to the right place!

Melanie Marcus Selfie

23 Healthy Halloween Recipes Plus Activities that Kids will LOVE!

Move over huge bags of sugary candy, festive fun is more important than ever!! This year, let’s fill the spooky season with creative Halloween recipes and activities that make kids of all ages smile and keep the sugar rush at bay.

Can the words healthy and Halloween really belong in the same sentence? According to research published in the Journal of the American Medical Association, they should! Healthy options are now more than ever! HealthHealthy options matter more now than ever! The research found that childhood obesity rose significantly during the pandemic, especially in children 5–11 years old. That weight gain—about 5 pounds per child—matches the increase seen in the past 20 years! Whether it’s due to food choices, junk food, ultra-processed foods, or a more sedentary lifestyle, it’s the perfect storm for weight gain, unhealthy foods, and health problems like heart disease. This makes our focus on Halloween party recipes and fun Halloween treats—without all the added sugar—a great idea this year.

Halloween is about much more than just candy. While candy corn, chocolate chips, and chocolate-containing foods have their place, Halloween parties are really about creative fun ideas, spooky activities, costumes, and eating the most festive collection of Halloween food ideas. With a bit of creativity and planning, you can enjoy a balanced diet and offer easy Halloween treats, appetizers, and finger foods that everyone will love—no sugar crash required!

Why Healthy Halloween Matters

Celebrating the spooky season is not about taking away your favorite things. It’s about enhancing the Halloween experience with better food choices and activities that also support kids’ health. Research shows that lack of sleep, ongoing stress, and poor food intake (especially high-calorie foods and unhealthy snacks) are important factors contributing to weight gain and even health conditions such as heart disease and mental health conditions. Offering healthy Halloween snacks and keeping physical activity as part of the fun are great ways to balance the scales.

And truthfully, with a little creativity, healthy Halloween snacks are sooo simple to make and they deliver a huge payoff because you kids won’t have sugar overload, or the inevitable crash afterwards!

Read on for healthy Halloween recipes and activities to enjoy the holiday in a healthy way.

23 Healthy Halloween Recipes and Fun Activities

Read on for a collection of Halloween recipes and activities to make your Halloween party or family celebration a huge hit! These Halloween food ideas are made to be enjoyed on Halloween night, at classroom parties, or anytime you want to make fall appetizers and snacks that are just as fun as candy—and way more nutritious.

Spooktacular Breakfasts

  • Mike Wazowski Fruit Stacks: Serve fruit stacks with yogurt for a healthy start to the day. These are balanced, fun Halloween treats kids will devour!
  • Dole Mike Wazowski Fruit Stacks and Dole Ghost Bananas: Bananas turned into little ghosts with mini chocolate chips and candy eyes—a perfect treat for a healthy Halloween breakfast.

Lively Lunches & Sandwiches

  • Spider Sandwiches: Cut a sandwich into a circle using a large cookie cutter. Lay pretzel sticks (4 on each side) between the layers for spider legs and add olive slices or candy eyes on top.
  • Chicken-Stuffed Roz Heads (Monsters Inc): Use your favorite chicken salad recipe to stuff bell peppers, decorating with olive slices and candy eyes for a spooky touch.
  • Dole Crazy Eyes: Baguette slices topped with peanut butter, banana, blueberry, and squiggly lines of raspberry jam—easy, fun, and healthy.

Wholesome Dinners

  • Pumpkin Stuffed Peppers: Carve faces into bell peppers before stuffing and baking them for a jack-o-lantern-inspired dinner.
  • Jazzed-Up Salads: Serve salads topped with “Meanies” (decorated produce), bright fall veggies, and a homemade dressing—the perfect finger food for Halloween parties.
  • Pumpkin Hummus: Shape classic hummus into a pumpkin and use a cucumber or celery stick for a stem.

Snacks & Easy Halloween Treats

  • Witchy Dip: Guacamole in a shallow dish, topped with blue corn chips for a hat, carrot shreds for hair, a mini pickle nose, olive slices for eyes, and red pepper for a mouth.
  • Banana Ghosts: Halved bananas rolled in yogurt and unsweetened coconut, topped with mini chocolate chips for eyes.
  • Banana Mummies: Wrap banana slices with fruit leather and add candy eyes for a spooky effect.
  • Candy Corn Parfaits: Clear cups layered with diced papaya, pineapple, and vanilla Greek yogurt—a healthy twist on the classic candy corns.
  • Monster Mouths: Apple slices with marshmallow and slivered almond “teeth” and strawberry “tongues”—a sweet tooth–satisfying, fun project for kids.
  • Clementine Pumpkins: Mandarin oranges are transformed with a black food marker face and celery stick stem.
  • Strawberry Ghosts: Drizzle melted white chocolate over strawberries and decorate with candy eyes, dark chocolate, or colored chocolate chips.
  • Bat Energy Bites: Add candy eyes and blue corn tortilla wings to your favorite energy bite recipe for a Halloween party finger food.
  • Franken-smoothies: Green smoothie poured into a clear decorated cup for a fun Halloween treat.
  • Witching Hour Fro Whip & Pumpkin Spice Sweet Potato Dole Whip: Frozen treats made with fruit and veggies for simple Halloween desserts with fewer calories and more nutrients.
  • Witches Fingers: Moondrop grapes with slivered almond nails for a creative, healthy snack.
  • Witch Brooms: String cheese cut into bristles with pretzel sticks for handles.
  • Green Slimesicles: Popsicles made with pureed fruit and veggies for a scary-good snack.
  • Veggie Skeleton: Use various types of food, like cut veggies and hummus, to make a skeleton platter—makes eating veggies a huge hit!
  • Apple Slices & Nut Butter: Top apple slices with nut butter and dark chocolate chips for a perfect treat.
  • Hummus Pumpkin, Sparkling Ghouls Mocktail, Dole Sparkling Ghouls: Festive drinks and party snacks for Halloween parties and get-togethers.
    Easy Halloween Desserts and Sweets
  • Oreo Cookie Spiders: Classic finger food—just stick pretzel legs into Oreo cookies, add candy eyes, and enjoy.
  • Spiderweb Cake or Cupcakes: Use white or dark chocolate icing to create a spiderweb design on your favorite healthy cake or cupcakes.
  • Witch Finger Cookies: Bake cookies shaped like witch fingers and decorate with almond “nails” and a touch of food coloring.
  • Pumpkin Spice Sweet Potato Dole Whip: Cozy pumpkin spice flavor in a creamy, naturally sweet frozen treat.

What to stock up on to make Halloween snacks a breeze

  • Toothpicks
  • Candy Eyes
  • Chocolate in various colors
  • Parchment Paper
  • Mini chocolate Chips
  • Mini marshmallows
  • Slivered Almonds
  • Black food marker
  • Clear plastic cups
  • Straws

Fun Halloween Activities

Besides these healthy Halloween recipes, there are plenty of fun ideas to make memories and get everyone moving:

  • Pumpkin or Pineapple Jack-o’-Lanterns: Don’t limit yourself to pumpkins—use pineapples for a fresh fruit centerpiece!
  • Halloween Veggie Skeleton: Challenge kids to make a skeleton from cut veggies—the spooky shape is an easy way to encourage healthy food intake.
  • Halloween-Themed Activities: Monster dances, costume parades, scavenger hunts for healthy snacks, or a contest for the coolest food presentation.
  • Making Snack Packs: Fill small clear cups with air-popped popcorn, cheese cubes, or dried fruit and decorate for a grab-and-go snack table.

What to Stock Up On for Fun Halloween Treats

  • Toothpicks
  • Candy eyes
  • Chocolate (in various colors)
  • Mini chocolate chips
  • Mini marshmallows
  • Slivered almonds
  • Black food marker
  • Clear plastic cups
  • Straws
  • Parchment paper

Tips for Success: Keep It Easy, Delicious, and Festive

Halloween recipes and easy Halloween desserts don’t have to mean sugar overload. Focus on simple ingredient swaps—like using Greek yogurt instead of cool whip, air-popped popcorn over chips, or offering more healthy snacks and fewer ultra-processed foods. Prepping finger foods and easy Halloween treats ahead makes it easier to say “yes” to healthier choices on Halloween night or at Halloween parties.

Indulge your sweet tooth with easy swaps like dark chocolate, fresh fruit, and even smaller portion sizes—each is a good idea for kids and grown-ups alike. Creating a balance between fun and nutrition makes for happy, energized party guests (and fewer blood sugar spikes, too!).


Final Tricks & Treats

This collection of Halloween food ideas is all about making the spooky season fun, memorable, and healthier for everyone. Whether you’re prepping fall appetizers for a class party, setting up healthy Halloween appetizers for neighbors, or looking for easy Halloween treats to send to school, these fun project ideas and healthy recipes will make Halloween a huge hit at your house—no matter what kind of eater you have.

Remember, the most frequently craved foods like candy bars, ice cream, and salty snacks don’t have to be the main event. Offering a variety of savory foods and sweet foods in creative shapes and colors can satisfy everyone’s intense desire for a particular type of food, boost nutrition, and keep Halloween the perfect treat for kids of all ages.

Happy (and healthy) Halloween!

Make a Halloween Pineapple Jack-o-lantern!

Nothing says Halloween fun like jack o’ lanterns!! But instead of using a pumpkin, why not use a pineapple! You can eat the inside and then create a fresh fruit centerpiece that everyone will be talking about!

Pineapple Jack O Lantern

Carve a festive centerpiece for your Halloween season!

Equipment

  • 1 Pineapple 5" wide and 7" tall
  • 1 serrated knife
  • 1 spoon
  • 1 cutting board
  • 1 pineapple corer optional

Instructions

  • Cut the bottom of the pineapple off using the serrated knife, then cut around the inside edge of the pineapple, keeping the walls of the pineapple about 1" thick for support.
  • Use the knife and spoon to remove the pineapple flesh, including the core, until nice and clean. Place the pineapple flesh in a bowl to eat.
  • Using the serrrated knife, carefully cut out your face!
  • Place the finished pineapple on a plate and enjoy the look and taste of your creation!
  • when it gets dark, place a lit LED candle on the plate under the pineapple Jack-O-Lantern

Cooking as a way to instill good habits in kids

Little ones love to stay busy and if you’re a parent, then you know that children love to get involved with whatever YOU are doing. From dusting to washing dishes or even sharing your meal, if you’re doing it, then your toddler wants in on the action. Why not take advantage of their enthusiasm to teach a new skill and build better cooking habits for the whole family?

This article was adapted from a piece written for Dole Food Company.

Cooking with children is a great way to help them build confidence and lay the foundation for healthy eating as they grow. Research also shows that cookin meals at home resultsin eating fewer calories, and negative nutrieints like saturated fat and sugar- even when you’re not trying to lose weight! So why not try new foods together while teaching children this essential life skill?

Melanie Marcus MA RD

Here are five tips for cooking-up healthy habits in the kitchen:

  1. Dress for the part! Pull out the aprons and get everyone in costume. If you really want to be official, check out this Dole printable chef’s hat. Children will love to personalize their own before getting busy in the kitchen! 
  2. Give them a seat at the table (literally)!  Instead of sitting little helpers on the counter, get them a step stool so they can see the counter – most importantly, what’s in that big bowl – or sit them in a booster seat at the table so they can help measure, mix and complete other age-appropriate tasks. This keeps them interested and safe. And remember to always wash hands before getting started! That is food safety 101! 
  3. Mise en place!  This is French for “everything in its place.” Set out your ingredients on the counter in pre-measured amounts that match the recipe. Maybe your child can help measure dry beans or flour? Or pull items out of the pantry? To hold little ones’ attention, start following the recipe directions only after everything is prepped. Start with simple recipes to minimize tantrums.
  4. Prepare for spills! Have your kitchen towel handy and put a garbage bowl on the counter is the best way to help clean along the way. It’s always easier to stay on track with recipes when you have a clean workspace.
  5. Set a fun table! The best part of cooking is eating! While dishes simmer or bake away, have children set the table. If they’re too little to handle carrying your fine dishware, use paper! And don’t forget the placemats. This Dole placemat will keep the kiddo’s coloring until their dinner is ready to eat. And older kids might enjoy personalizing a downloadable menus and recipe cards to turn your kitchen into a French bistro!

How to choose healthy recipes to make with your little chef

  • Start with simple snack foods. It could be as basic as having younger children use small cookie cutters to make shapes out of melon.
  • Other healthy snacks to try could be apple slices with hummus dip. Have children slice the apple with a safety knife and scoop dip into a bowl.
  • Look to your family traditions. What foods have meaning to your family. Is there special sweet treat or holiday food you can tell a story about?
  • Take a trip to the farmers market or grocery store and let your little chef choose an ingredient to work with.
  • Have your little kids scan through cookbooks or magazines to choose kid-approved recipes by looking at pictures.
  • What about something simple and easy that even picky eaters will love? Check out these simple banana oatmeal cookies.
  • If all else fails get a ball of whole grain pizza dough from the grocery store. Shape into a round and top with your favorite sauce, cheese and olive oil. You can top with veggies of choice and a green salad for a delicious dinner.
Small sized and safe tools empower children to take snack time into their own hands the healthy way!!

Benefits of cooking with kids

  • What’s better than sneaking a little extra reading time. Have them read the list of ingredients or point out letters of the alphabet.
  • They learn important math skills from measuring out ingredients!
  • They become familiar with kitchen tools
  • They can hone fine motor skills when the write out the shopping list.
  • It’s the perfect time to talk nutrition and the benefits of eating lots of colorful vegetables!
  • It’s an excellent way to spend one on one quality time.
  • It’s a great time to forget the stress and focus on the task at hand – for parents and kids!
  • Picky eaters are more likely to try new things if they’ve made them!

Things to consider buying to make cooking with kids easier!

Plastic chef knives give small hands the freedom to do the same thing you do! It makes them feel special and can motivate them to do prepare foods on their own!

A kid safe kitchen stool. These are built with safety in mind, to get kids up at counter level while ensuring they don’t fall.

Cookie cutters of all shapes and sizes. These again, are a fun way to add creativity to meals and snacks – especially fruits! My daughter loves to makes shapes out of melon and then skewer them onto toothpicks.

Bonus: Kids are more likely to try foods that they help prepare in the kitchen! Take advantage of that opportunity to make family meals that include fruits and vegetables and other healthy ingredients that improve diet quality.