Tag: Recipe

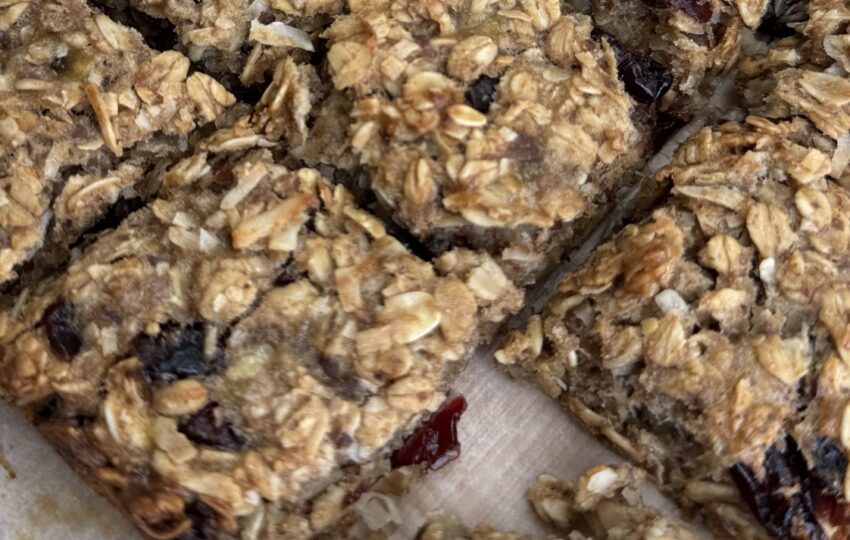
Pumpkin Pie Spice Baked Oatmeal Recipe (Gluten Free)

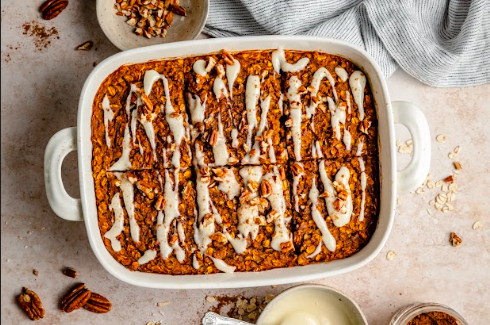
This recipe is for the pumpkin spice fans out there.  It checks the box for warm spices, quick breakfast and macro friendly. Now that I think about it, it’s kinda custardy like pumpkin pie. This Pumpkin Pie Oatmeal Bake is a hearty, baked oatmeal treat that’s absolutely one of my favorite breakfasts. Packed with nutrients and easy to prepare, this oatmeal bake is a great way to start your day right. 

You may also like my GF pumpkin muffins or the pumpkin spiced Dole whip too. LMK if you try them!

😍 Why You’ll Love Pumpkin Pie Oatmeal Bake

  • Healthy Breakfast Staple: Packed with protein and fiber, it’s a good source of protein with 10g per serving and keeps you full longer.
  • Meal Prep Friendly: Prepare it ahead of time and have individual portions ready for those hectic mornings.
  • Fall Flavors Galore: The pumpkin spice flavor will remind you of a cozy pumpkin spice latte.
  • Simple Ingredients: Uses basic ingredients you probably already have in your pantry.
  • Versatile and Delicious: Customize with your favorite things like chocolate chips, almond butter, or a dollop of Greek yogurt. I won’t lie, sometimes I just have it as my after dinner treat.  
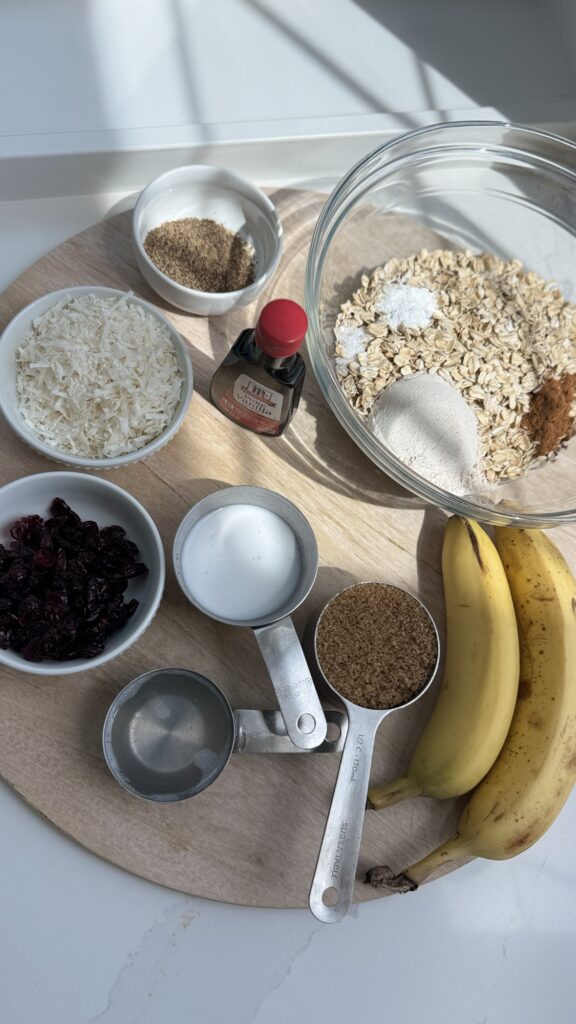
🗒️ Ingredients

  • rolled oats – you can use quick oats as well.  Though, I think rolled provide a better texture.  
  • pumpkin puree- don’t use pumpkin pie filling.  While tasty, it is sweetened pumpkin with extra calories and added sugar which we’re trying to avoid!
  • large eggs – you can substitute up to 2 eggs for flax eggs and still get that custardy texture.  
  • almond milk – or milk of choice.  Using cow’s milk will add protein.
  • pure maple syrup – coconut sugar is a good alternative
  • vanilla extract
  • pumpkin pie spice – if you don’t have it, use equal parts cinnamon and nutmeg.
  • baking powder
  • salt
  • walnuts or pecans (optional)
  • raisins or dried cranberries (optional)
  • Optional toppings for serving, like a drizzle of maple syrup or peanut butter

💡 Gluten-Free? Read This!

To make this recipe gluten-free, simply substitute the rolled oats for certified gluten-free oats or quick oats. You’ll get the same flavor and best texture with these alternatives!

👩‍🍳 How to Make My Pumpkin Pie Oatmeal Bake

  1. Prepare the Baking Dish: Preheat your oven to 350°F (175°C) and grease a 9×9-inch baking dish with cooking spray.
  2. Mix Wet Ingredients: In a large bowl, whisk together the pumpkin purée, eggs, almond milk, pure maple syrup, and vanilla extract until smooth.
  3. Combine Dry Ingredients: In a separate bowl, mix the rolled oats, pumpkin pie spice, baking powder, and salt.
  4. Combine and Pour: Combine the wet ingredients and dry ingredients, stirring until well mixed. If using, fold in the nuts and dried fruit.
  5. Bake: Pour the mixture into the prepared baking dish and spread evenly. Bake for 30-35 minutes until the center is set and the edges are golden brown.
  6. Serve: Allow to cool slightly before cutting into squares. Serve warm with a drizzle of maple syrup or a dollop of Greek yogurt.

Join my next 6 week challenge!

Tired of endless diets and no results? Join the FASTer Way to Fat Loss and see real, sustainable changes in just 6 weeks!

Melanie Marcus FASTer Way to Fat Loss Coach

📓 Best Served With

This pumpkin oatmeal bake pairs wonderfully with:

  • A warm cup of coffee or English Breakfast tea
  • Fresh fruit like berries or apple slices
  • Your favorite nut butter or almond butter spread on top

👝 How to Store Leftovers

Store leftovers in an airtight container in the refrigerator for 3-4 days.  To enjoy the next morning, reheat in a toaster oven or microwave.

🧠 Common Questions

  • Can I use steel-cut oats instead of old-fashioned oats?  

  Absolutely! Steel-cut oats will add a nice chewy texture, but ensure to adjust the baking time slightly.

  • Can I substitute the sweetener?  

  Yes! Feel free to use honey, brown sugar, or coconut sugar instead of pure maple syrup. Monk fruit crystals would make this a sugar free option.

If you try this recipe, and I hope you do! Leave a comment below or tag me on social @miss_nutritious_eats!

Pumpkin Spice Oatmeal Bake

Course Breakfast
Servings 4
Calories 245 kcal

Ingredients
  

  • 1 cup rolled oats
  • 1 can pumpkin puree 15 oz
  • 4 large eggs
  • 1 cup almond milk
  • 1/4 cup maple syrup
  • 1 teaspoon vanilla extract
  • 1 teaspoon cinnamon
  • 1/2 teaspoon nutmeg
  • 1/2 teaspoon baking powder
  • 1/4 teaspoon salt
  • 1/2 cup chopped walnuts or pecans optional
  • 1/2 cup raisins or dried cranberries optional

Instructions
 

  • Preheat your oven to 350°F (175°C) and grease a 9×9-inch baking dish.
  • In a large bowl, whisk together the pumpkin puree, eggs, almond milk, maple syrup, and vanilla extract until smooth.
  • In a separate bowl, mix the rolled oats, cinnamon, nutmeg, baking powder, and salt. Combine the wet and dry ingredients, stirring until well mixed. If using, fold in the nuts and dried fruit.
  • Pour the mixture into the prepared baking dish and spread evenly. Bake for 30-35 minutes, or until the center is set and the edges are golden.
  • Let cool slightly before cutting into squares and serve warm!

Nutrition

Calories: 245kcalCarbohydrates: 37gProtein: 10gFat: 7gSaturated Fat: 2gPolyunsaturated Fat: 2gMonounsaturated Fat: 2gTrans Fat: 0.02gCholesterol: 164mgSodium: 351mgPotassium: 403mgFiber: 6gSugar: 16gVitamin A: 16775IUVitamin C: 4mgCalcium: 195mgIron: 3mg
Tried this recipe?Let us know how it was!

Quick Oven Baked Chicken Parmesan Recipe

I’m on a constant quest for an easy chicken dinner that will please my whole family.  And by that I mean, I want my husband to like it, I’d like my kids to at least try it and ideally it willI meet my macros (low in fat and higher in protein).  So, if you’re looking for that too, this oven-baked chicken parmesan is the perfect option. 

Jump to Recipe

😍 Why You’ll Love my baked chicken parm

While it tastes great and is a major crowd pleaser, what I love most is that all the chicken can be cooked at the same time, in one pan in the oven making it a quick weeknight dinner. Say goodbye to air frying or pan frying in batches and say hello to crispy chicken cutlets.  The best part is you can stop there for sandwiches or picky kids or top with tomato sauce and shredded cheese for an easy chicken parmesan .  It’s the classic Italian dish without the extra effort and mess of frying. ❤️

🗒️ Ingredients

  • boneless skinless chicken breasts – I usually take one pound of boneless, skinless chicken breast and butterfly each breast making two thinner pieces.  
  • eggs – this is for making and egg wash before dredging in the breadcrumb mixture.
  • Kosher salt – I like Diamond Crystal.  
  • black pepper – go with fresh cracked black pepper
  • Panko bread crumbs – Instead of using Italian bread crumbs we’re making our own by adding dried spices and cheese.  
  • dried oregano
  • garlic powder
  • parmesan cheese
  • cooking spray – you can use an olive oil cooking spray 
  • mozzarella cheese – I suggest grating your own or last night I even used the mini mozzarella pearls from Trader Joe’s and they came out great!  
  • marinara sauce – If you have homemade pasta sauce definitely use it, if not, I usually have Rao’s on hand.  

👩‍🍳 How to Make My baked chicken parm

Step 1: Prepare Your Chicken

Remove the chicken breasts from the refrigerator up to an hour before cooking. You want them at room temperature for even cooking. Pat them dry with a paper towel and use a meat mallet to pound them to a uniform thickness. This helps you get that perfect golden brown crust.

Step 2: Season and Coat

In a shallow bowl, combine breadcrumbs, oregano, garlic powder, and grated parmesan cheese. After seasoning the chicken with salt and pepper, dip chicken cutlets into the breadcrumb mixture, ensuring a full coating on each.

Step 3: Set Up for Easy Cleanup

Place a wire rack on a baking sheet lined with foil or parchment paper. Spray the rack with cooking spray for a healthy chicken option using less oil.

Step 4: Baking Time

Preheat your oven to 450 degrees. Arrange the breaded chicken in a single layer on the wire rack to ensure even crisping. Bake for 20-25 minutes. Use an instant-read thermometer to ensure the chicken reaches an internal temperature of 165°F.

Step 5: Add Sauce and Cheese

Remove the chicken from the oven and spoon 1-2 tablespoons of marinara sauce on top of each cutlet. Sprinkle with shredded mozzarella cheese. Return to the oven for 5 more minutes of baking, until the cheese is melted and bubbly.

Step 6: Serve and Enjoy

Garnish your chicken parmigiana with fresh parsley and serve alongside pasta or a simple salad. This particular recipe is also a great option for picky eaters who might not enjoy traditional Italian food.

💡Gluten-Free? Read This!

Just swap out your panko breadcrumbs for gluten free breadcrumbs and you’re set! 

📓 Best served with

Serve with nutrient-dense, lower-calorie sides that complement its flavors without adding unnecessary calories. Here are some healthier side options:

1. Vegetable-based sides

Steamed or roasted vegetables: Broccoli, zucchini, asparagus, or green beans provide fiber and vitamins with minimal calories.

Zoodles (zucchini noodles): A low-carb alternative to traditional pasta.

Cauliflower rice: A grain-free, low-calorie option that absorbs flavors well.

2. Salads

Mixed greens salad: Toss leafy greens like spinach or arugula with a light vinaigrette.

3. Whole grains or grain alternatives

Whole wheat pasta: If you prefer pasta, opt for whole grain versions for more fiber and nutrients.

Spaghetti squash: A great low-calorie substitute for traditional spaghetti.

👝 How to Store Leftovers

1. Cool It Down

Let the Chicken Parmesan cool to room temperature (about 30 minutes) before storing it. Avoid placing hot food directly in the fridge to prevent moisture buildup, which can make it soggy.

2. Use Airtight Containers

Place the Chicken Parmesan in an airtight container to prevent air exposure, which can cause the food to dry out or develop freezer burn. Separate the chicken from the sauce, if possible, to maintain crispness.

3. Refrigeration (Short-term Storage)

Store in the fridge for up to 3-4 days.

Reheat by placing it in the oven at 350°F (175°C) for about 10-15 minutes, or until heated through. This helps the chicken stay crispy. You can also use a microwave for quicker reheating, but the texture may be softer.

Join my next 6 week challenge!

Tired of endless diets and no results? Join the FASTer Way to Fat Loss and see real, sustainable changes in just 6 weeks!

Melanie Marcus FASTer Way to Fat Loss Coach

🧠 Common Questions

1. How do I get the chicken crispy?

Pat the chicken dry before breading and use panko breadcrumbs instead of regular breadcrumbs for extra crunch (or a combo of both). 

2. How do I prevent soggy Chicken Parmesan?

Keep the sauce and chicken separate until serving if possible. When assembling, only lightly coat the top of the chicken with sauce to avoid the breading becoming soggy. Broiling the dish at the end for 1-2 minutes can help crisp up the top layer.

3. What’s the best cheese to use for Chicken Parmesan?

Mozzarella, Parmesan, and Provolone are commonly used. Mozzarella provides a melty texture, Parmesan adds a sharp flavor, and Provolone is a mild, creamy option. You can also use part-skim mozzarella for a lighter version.

4. Can I make Chicken Parmesan ahead of time?

Yes. You can bread and fry the chicken in advance, then store it in the fridge for up to a day before assembling and baking. However, add the sauce and cheese right before baking to keep the chicken crispy.

5. What’s the best way to reheat Chicken Parmesan?

Tip: Reheat in the oven at 350°F (175°C) to maintain crispness, or use a microwave for a faster option. If reheating in the microwave, place a damp paper towel over the dish to prevent the chicken from drying out.

6. Can I make a gluten-free version of Chicken Parmesan?

Yes. Substitute the breadcrumbs with gluten-free breadcrumbs and use gluten-free flour for dredging the chicken. 

7. What can I substitute for chicken?

Eggplant or tofu are great alternatives. For eggplant, slice, salt, and pat dry before breading and baking. For tofu, press it to remove excess moisture, then bread and bake as you would with chicken.

Baked Chicken Parm

Course Main Course
Cuisine Italian
Servings 4
Calories 316 kcal

Equipment

  • large sheet pan
  • baking rack

Ingredients
  

  • 1 pound boneless skinless chicken breasts sliced in half to make 8
  • 1/2 tsp Kosher salt
  • ¼ teaspoon fresh cracked black pepper
  • 1 cup Panko bread crumbs
  • ½ teaspoon dried oregano
  • ½ teaspoon garlic powder
  • 1/4 cup grated Parmesan Cheese
  • cooking spray
  • 1 cup mozzarella cheese grated
  • 1 cup marinara sauce

Instructions
 

  • Remove the chicken breasts from the refrigerator up to an hour before cooking. You want them at room temperature for even cooking. Pat them dry with a paper towel and use a meat mallet to pound them to a uniform thickness. This helps you get that perfect golden brown crust.
  • In a shallow bowl, combine breadcrumbs, oregano, garlic powder, and grated parmesan cheese. After seasoning the chicken with salt and pepper, dip chicken cutlets into the breadcrumb mixture, ensuring a full coating on each.
  • Place a wire rack on a baking sheet lined with foil or parchment paper. Spray the rack with cooking spray for a healthy chicken option using less oil.
  • Preheat your oven to 450 degrees. Arrange the breaded chicken in a single layer on the wire rack to ensure even crisping. Bake for 20-25 minutes. Use an instant-read thermometer to ensure the chicken reaches an internal temperature of 165°F.
  • Remove the chicken from the oven and spoon 1-2 tablespoons of marinara sauce on top of each cutlet. Sprinkle with shredded mozzarella cheese. Return to the oven for 5 more minutes of baking, until the cheese is melted and bubbly.

Nutrition

Calories: 316kcalCarbohydrates: 16gProtein: 35gFat: 12gSaturated Fat: 6gPolyunsaturated Fat: 1gMonounsaturated Fat: 3gTrans Fat: 0.01gCholesterol: 100mgSodium: 1108mgPotassium: 673mgFiber: 2gSugar: 3gVitamin A: 548IUVitamin C: 6mgCalcium: 243mgIron: 2mg
Tried this recipe?Let us know how it was!

Chicken & Vegetable Stew (slow cooker, low fat)

There’s nothing quite like a steaming bowl of chicken and vegetable stew to warm you up on a chilly night. And it gets even better when cooking time is completely hands off.  ❤ This slow cooker chicken stew recipe is the perfect blend of hearty ingredients and comforting flavors, making it a healthy dinner that the whole family will love.

Jump to Recipe

📝 Ingredients You’ll Need

Here’s what you need to whip up this tasty stew:

  • boneless, skinless chicken breasts, diced
  • mixed vegetables (carrots, celery, bell peppers, zucchini) – you can use frozen vegetables if that’s what you have!
  • diced tomatoes (with juice)
  • low-sodium chicken broth – you can 100% use cold water to make this dish if stock isn’t available.  
  • garlic, minced
  • dried thyme – we’re using dried herbs for this recipe.  Fresh herbs would also work well, you may want to tie them together or put in a sachet to easily pick them out.  
  • dried oregano
  • bay leaf
  • Salt and black pepper to taste
  • Fresh parsley for garnish (optional)
Jump to Recipe

👩‍🍳 How to Make my Chicken & vegetable Stew

Creating this healthy chicken stew is simple, thanks to the magic of the slow cooker. Follow these step-by-step instructions for the best results:

  1. Prep your ingredients – Dice the boneless, skinless chicken breasts and chop your fresh veggies. 
  2. Combine everything – In your slow cooker, combine the raw chicken, mixed vegetables, diced tomatoes, and chicken broth. Add the minced garlic, dried thyme, oregano, bay leaf, salt, and black pepper.
  3. Stir it up – Mix everything together to ensure the chicken and vegetables are well-coated with the seasonings.
  4. Cook it slow – Cover and cook on low for 6-8 hours or on high for 3-4 hours until the chicken is cooked through and the vegetables are tender.
  5. Final touches – Remove the bay leaf before serving. Garnish with fresh parsley if desired.
  6. Serve & Enjoy – Pair with a side of warm bread for a complete meal. 
Jump to Recipe

🍳 Alternative Cooking Instructions Without a Slow Cooker

If you don’t have a slow cooker, making this creamy chicken stew on the stovetop is just as simple… it just takes a bit more hands on time.  Here’s how:

  1. Preparation: Begin by chopping your vegetables and cutting the chicken into bite-sized pieces.
  2. Sauté: In a large pot or Dutch oven, heat a tablespoon of olive oil over medium heat. Add the chicken pieces and cook until they are browned on all sides. Remove the chicken from the pot and set aside.
  3. Cook Vegetables: In the same pot, add a bit more olive oil if needed. Add the mixed vegetables minced garlic, dried thyme, oregano, bay leaf, salt, and black pepper.
  4. Combine Ingredients: Return the chicken to the pot and chicken broth and tomatoes.
  5. Simmer: Bring the stew to a boil, then reduce the heat to low, cover the pot, and let it simmer for about 45 minutes to an hour. Stir occasionally to prevent sticking.
  6. Thicken Stew: If you prefer a thicker consistency, mix a tablespoon of cornstarch with two tablespoons of cold water, then stir it into the stew until it thickens.
  7. Adjust Taste: Taste your stew and adjust the seasoning with salt and pepper. 

🍽️ Serving Suggestions

For a satisfying and hearty bowl of stew, serve your chicken and vegetable stew with some crusty bread.  Feel free to add frozen peas, diced red potatoes, sweet potatoes or green beans during the last hour of cooking for a bit of extra flavor and texture.  

📦 Storing Leftovers

If you find yourself with leftover chicken stew, store it in a freezer-safe container for up to three days in the fridge or three months in the freezer. Reheat slowly over medium heat to enjoy again.

🌿 Nutrition Information

Here’s the nutritional breakdown for this crockpot chicken stew recipe.  Note how low the fat is.  That’s because we’re taking advantage of the slow cooker and can avoid adding extra oil.  If you have the macros at the end you can always add a drizzle of extra virgin olive oil for flavor.  

  • Servings: 4
  • Serving Size: 1.5 cups
  • Calories: 285
  • Fat: 6g
  • Protein: 34g
  • Carbohydrates: 27g
  • Fiber: 8g

💡 Tips for the Best Stew

For added creaminess, experiment with different types of potatoes like russet potatoes or Yukon golds for a heartier texture. If you prefer a thicker stew, create a flour mixture or a cornstarch slurry to stir in at the end.  

Fresh rosemary would be a nice addition if you’re adding potatoes.  

This easy chicken stew is a great way to enjoy delicious slow cooker meals all year round.

Chicken and vegetable stew

Chicken & Vegetable Stew (slow cooker)

Course Main Course
Servings 4
Calories 285 kcal

Equipment

  • 1 Slow Cooker

Ingredients
  

  • 1 lb boneless skinless chicken breasts, diced
  • 4 cups mixed vegetables carrots, celery, onion, bell peppers, zucchini
  • 1 can 15 oz diced tomatoes (with juice)
  • 2 cups low-sodium chicken broth
  • 2 cloves garlic minced
  • 1 tsp dried thyme
  • 1 tsp dried oregano
  • 1 bay leaf
  • Salt and pepper to taste
  • Fresh parsley for garnish optional

Instructions
 

  • In the slow cooker, combine the diced chicken, mixed vegetables, diced tomatoes, and chicken broth.
  • Add the minced garlic, dried thyme, oregano, bay leaf, salt, and pepper.
  • Stir everything together to ensure the chicken and vegetables are well-coated with the seasonings.
  • Cover and cook on low for 6-8 hours or on high for 3-4 hours until the chicken is cooked through and the vegetables are tender.
  • Remove the bay leaf before serving. Garnish with fresh parsley if desired.

Nutrition

Calories: 285kcalCarbohydrates: 27gProtein: 34gFat: 6gSaturated Fat: 2gPolyunsaturated Fat: 1gMonounsaturated Fat: 2gTrans Fat: 0.02gCholesterol: 68mgSodium: 183mgPotassium: 930mgFiber: 8gSugar: 0.4gVitamin A: 9262IUVitamin C: 20mgCalcium: 74mgIron: 4mg
Tried this recipe?Let us know how it was!

About Me

I’m Melanie.

I’m a chef, registered dietitian, foodie, wife and mom.
If you’re looking for quick and healthy meal inspiration that serves YOU and your family well, then you’ve come to the right place!

Melanie Marcus Selfie

Creamy Garlic Parmesan Chicken (low carb + instant pot)

Need a quicker than quick and delicious meal that will satisfy your entire family? This garlic parmesan chicken is just the thing you need. It’s an easy chicken dinner and packed with flavor – this recipe belongs in your weeknight dinner rotation.  And if you don’t have an instant pot, I’ve got you covered with instructions for stovetop and oven method.  

Jump to Recipe

😍 Why You’ll Love this Garlic Parmesan Chicken

This dish brings a twist to classic French cuisine, crafted for today’s busy family. Imagine tender chicken smothered in a creamy garlic sauce made with rich cream and Parmesan cheese—delicious, right? Plus, it’s a win for low-carb fans with just 6g of carbs per serving! If you’re looking for quick and satisfying low-carb recipes this egg roll in a bowl and cabbage pizzas may also interest you!

🗒️ Ingredients

  • boneless, skinless chicken breasts
  • chicken broth or chicken stock or veggie broth works too!
  • heavy cream
  • Parmesan cheese
  • garlic, minced (for that authentic garlic flavor) I like to use frozen cubes and garlic powder will work too, if that’s all you have!
  • Italian seasoning (a mixture of spices for added depth)
  • Salt and pepper, to taste
  • spinach (fresh or frozen)
  • olive oil
  • Fresh parsley
Jump to Recipe

👩🏻‍🍳 How to Make My Creamy Garlic Parmesan Chicken

Instant Pot Method

  1. Sauté Function Activation:

 Set your Instant Pot to sauté mode. Add a little olive oil and minced garlic cloves, allowing them to sauté for about 1 minute until fragrant. Be careful not to burn the garlic.

  1. Prepare the Chicken:

 Season the boneless skinless chicken breasts with salt, pepper, and Italian seasoning. Add them to the bottom of the pot, searing each side for about 2-3 minutes until golden brown.

  1. Pressure Cooking:

 Pour in the chicken broth, ensuring you scrape up any brown bits from the bottom of the pot with a wooden spoon. This prevents a burn notice. Close the lid, set the valve to sealing, and cook on high pressure for 10 minutes.

  1. Quick Release:

   Carefully execute a quick pressure release. Remove the cooked chicken and set it aside.

  1. Creating the Creamy Sauce:

 Stir in the heavy cream and Parmesan cheese until the mixture is smooth. Add in the spinach and return the chicken to the pot, cooking for an additional 2-3 minutes until heated through.

📓 Best served with

  Serve this creamy garlic chicken over zucchini noodles or alongside a side salad for a complete meal. And there’s no denying it would also go really well with creamy mashed potatoes.  

👝 How to Store Leftovers

Refrigeration: Once chicken has cooled and has come to room temperature, store any leftovers in an airtight container. It can be kept in the refrigerator for up to 3-4 days. Make sure to place the container at the back of the fridge where it’s coldest.

Freezing: For longer storage, you can freeze the creamy garlic chicken. Place the chicken and sauce in freezer-safe containers or resealable plastic bags, removing as much air as possible. Label with the date and freeze for up to 2 months.

Reheating: To reheat, thaw the frozen chicken overnight in the refrigerator. Warm it in a skillet over medium heat or in an oven set to 350°F (175°C) until thoroughly heated. Avoid reheating in the microwave, as it can cause the chicken to become rubbery and the sauce to separate.

🧠 Common Questions

Can I use chicken thighs?

Chicken thighs and breasts are both excellent sources of lean protein, but they have their differences when it comes to calories and fat content! For instance, a 3-ounce skinless chicken breast packs in about 140 calories, with just 3 grams of total fat and a mere 1 gram of saturated fat. On the flip side, the same serving of dark meat without the skin offers 170 calories, 9 grams of total fat, and 3 grams of saturated fat. While the difference may seem small, it can really add up depending on your portion size. So, whether you prefer the light and lean breast or the rich, flavorful thigh, being mindful of these differences can help you make the best choice for your meal!

You can use chicken thighs for this recipe, just keep in mind cook time will be slightly longer especially if you use bone in vs boneless chicken thighs.

​What if I don’t have an instant pot or pressure cooker?

If you don’t have an Instant Pot, don’t worry! You can still enjoy this creamy garlic chicken using a stovetop and an oven, cooking time will just be a bit longer. Here’s how:

  1. Preheat the Oven: Begin by preheating your oven to 375°F (190°C).
  2. Sear the Chicken: In a large oven-safe skillet, heat a tablespoon of olive oil over medium-high heat. Season your chicken breasts with salt and pepper, then sear them in the skillet for about 2-3 minutes on each side until golden brown. Remove the chicken and set it aside.
  3. Prepare the Sauce: In the same skillet, reduce the heat to medium and add a bit more olive oil if needed. Sauté minced garlic for about 1 minute until fragrant. Pour in the chicken broth and heavy cream, stirring to combine. Bring the mixture to a gentle simmer.
  4. Add Ingredients: Stir in the Parmesan cheese until the sauce is smooth. Add the spinach and return the chicken pieces to the skillet in a single layer.
  5. Bake: Transfer the skillet to the preheated oven. Bake for approximately 20-25 minutes until the chicken is cooked through and the sauce has slightly thickened. The internal temperature of the chicken should reach 165°F (74°C).
  6. Serve: Once done, remove from the oven and let it rest for a few minutes before serving. 

​Can this recipe really fit into a healthy diet?  

​Yes!  Let me explain.  While this recipe seems high in fat, it’s also high in protein and very satisfying.  I don’t recommend a high fat meal like this every day, but when we focus on low carb days, the majority of calories need to come from fat to gain the benefits of carb cycling.  (We talk about this more in my weight loss program called The FASTer Way).  

Join my next 6 week challenge!

Tired of endless diets and no results? Join the FASTer Way to Fat Loss and see real, sustainable changes in just 6 weeks!

Melanie Marcus FASTer Way to Fat Loss Coach

🍎 Nutritional Information

For those counting macros, here’s what you can expect from each serving (1 chicken breast in sauce):

  • Calories: 250
  • Fat: 30g
  • Protein: 40g
  • Carbohydrates: 6g
  • Fiber: 1g

This recipe makes 4 servings.  

Fast, Fresh & Fat-Loss Friendly! 🚀🥑

Kickstart your health journey with these 3 FREE guides—perfect for intermittent fasting, weight loss on the go, and jumpstarting fat loss. Grab yours and make healthy eating easier than ever! 💪

On The GO

Chilled iced coffee in a Starbucks cup on a wooden table creating a refreshing vibe.

I love cooking, but it seems like with 2 school aged children, we are always on the go. Here are some of my go-tos.

Jumpstart Fat Loss

A woman pinches her tricep skin to evaluate body fat in a fitness context.

If your new year’s resolution isn’t delivering results, this fat loss guide is for you. Start feeling the difference right away 🙂

Intermittent Fasting Quiz

A woman holding a pitcher of water and a glass in a sunny outdoor setting.

Research suggests intermittent fasting can be an effective way to maintain and achieve a healthy weight. But is it right for you?

👯‍♀️ Get social!

I love sharing great recipes and hearing from you! Snap a picture of your creamy garlic chicken, share it on social media, and tag me, @miss_nutritious_eats. 

Creamy Garlic Parmesan Chicken

Course Main Course
Cuisine Italian
Servings 4
Calories 473 kcal

Equipment

  • 1 instant pot

Ingredients
  

  • 4 boneless skinless chicken breasts
  • 1 cup chicken broth
  • 1 cup heavy cream
  • 1 cup Parmesan cheese grated
  • 4 cloves garlic minced
  • 1 teaspoon Italian seasoning
  • Salt and pepper to taste
  • 2 cups spinach fresh (1 cup frozen)
  • 1 tablespoon olive oil
  • Fresh parsley for garnish

Instructions
 

  • For the Instant Pot, set it to sauté mode, adding olive oil and minced garlic; sauté for about 1 minute until fragrant.
  • Season the chicken breasts with salt, pepper, and Italian seasoning, then add them to the pot and sear on both sides for about 2-3 minutes.
  • Pour in the chicken broth, close the lid, and set the valve to sealing.
  • Cook on high pressure for 10 minutes, then carefully release the pressure.
  • Remove the chicken and set aside, stirring in the heavy cream and Parmesan cheese into the pot until smooth.
  • Add the spinach and return the chicken to the pot, cooking for an additional 2-3 minutes until heated through.

Nutrition

Calories: 473kcalCarbohydrates: 5gProtein: 36gFat: 35gSaturated Fat: 19gPolyunsaturated Fat: 2gMonounsaturated Fat: 11gTrans Fat: 0.01gCholesterol: 158mgSodium: 779mgPotassium: 612mgFiber: 1gSugar: 2gVitamin A: 2520IUVitamin C: 7mgCalcium: 372mgIron: 1mg
Keyword gluten free, low carb
Tried this recipe?Let us know how it was!

Sheet pan lemon and garlic shrimp with asparagus

Looking for an easy sheet pan dinner that’s both delicious and perfect for busy weeknights? How about one that’s high in protein and lower in calories too?  This Sheet Pan Lemon Garlic Shrimp and Asparagus recipe has you covered. It’s a great way to make a complete meal with minimal effort and maximum flavor. 

Jump to Recipe

😍 Why you’ll love my sheet pan asparagus & shrimp

You will 100% love this sheetpan asparagus and shrimp recipe because it’s super quick to prepare, making it perfect for busy weeknights. It’s also high in protein, ensuring a satisfying meal without the fuss. Using a single sheetpan means minimal cleanup which noone will argue is a major bonus!

📒 Ingredients

  • Large shrimp, peeled and deveined – I usually get frozen shrimp from Trader Joe’s or Costco and defrost what we need as needed.
  • fresh asparagus, trimmed
  • olive oil – regular olive oil is good for this. No need to do extra virgin olive oil.
  • garlic – I often use frozen cubes
  • lemon
  • paprika
  • Salt and black pepper
  • Fresh parsley

👩🏻‍🍳 How to make my sheet pan asparagus & shrimp

  1. Prepare the Shrimp and Asparagus: Preheat your oven to 400°F (200°C). On a prepared sheet pan lined with parchment paper or non-stick spray, place asparagus and shrimp in separate halves of the pan. Trim ends of asparagus spears to remove any tough ends.
  2. Season the Ingredients: In a large bowl, mix together olive oil, minced garlic, fresh lemon juice, lemon zest, paprika, kosher salt, and black pepper. Add the shrimp and asparagus to the bowl and toss until well-coated. For marinated shrimp, you can leave the mixture to sit and absorb flavors for a few minutes of prep time.
  3. Arrange on the Sheet Pan: Spread everything into a single layer on your large sheet pan for even cooking. For best results, make sure the asparagus and shrimp aren’t overcrowded. If needed, use a second half of another pan.
  4. Bake: Cook in the preheated oven for about 10-12 minutes. Keep an eye on the shrimp as they cook; you’re looking for them to be pink and cooked through while the asparagus remains tender but still crunchy.
  5. Garnish and Serve: Remove from the oven and garnish with fresh parsley, lemon slices, and a sprinkle of parmesan cheese. Serve alongside a side of brown rice or coconut rice for a complete meal.

🧠 Common Questions

Does Shrimp Sizes Matter? The size of your shrimp can affect cooking time, so adjust accordingly. Fresh shrimp works best, but frozen shrimp is a good alternative—just make sure to thaw and pat dry with paper towels before using.  I usually buy frozen shrimp from Costco or Trader Joe’s.  

Do I have to use fresh ingredients? Fresh asparagus and fresh lemon juice will enhance the flavors of this dish, making it a perfect asparagus dinner.

What other seasonings can I use? Add a kick to your dish with red pepper flakes, onion powder, or garlic powder. The best part of this easy way to cook is how customizable it is!

👝 How to store leftovers

Storage and Meal Prep: This is an easy meal for meal prep. Save leftovers in airtight containers for lunch or as lighter meals throughout the week.

Keep this easy recipe in your back pocket for quick weeknight dinners.  Shrimp cook so quickly, you’ll be making this sheet pan recipe more than you think!

Sheetpan Shrimp and Asparagus

Prep Time 5 minutes
Cook Time 10 minutes
Total Time 15 minutes
Course Main Course
Cuisine American
Servings 2
Calories 314 kcal

Ingredients
  

  • 1 lb large shrimp peeled and deveined
  • 1 bunch fresh asparagus trimmed
  • 2 tablespoons olive oil
  • 4 cloves garlic minced
  • 1 lemon zested and juiced
  • 1 teaspoon paprika
  • Salt and black pepper to taste
  • Fresh parsley chopped (for garnish)

Instructions
 

  • Preheat your oven to 400°F (200°C). On a prepared sheet pan lined with parchment paper or non-stick spray, place asparagus and shrimp in separate halves of the pan. Trim ends of asparagus spears to remove any tough ends.
  • In a large bowl, mix together olive oil, minced garlic, fresh lemon juice, lemon zest, paprika, kosher salt, and black pepper. Add the shrimp and asparagus to the bowl and toss until well-coated. For marinated shrimp, you can leave the mixture to sit and absorb flavors for a few minutes of prep time.
  • Spread everything into a single layer on your large sheet pan for even cooking. For best results, make sure the asparagus and shrimp aren’t overcrowded. If needed, use a second half of another pan.
  • Cook in the preheated oven for about 10-12 minutes. Keep an eye on the shrimp as they cook; you’re looking for them to be pink and cooked through while the asparagus remains tender but still crunchy.
  • Remove from the oven and garnish with fresh parsley, lemon slices, and a sprinkle of parmesan cheese. Serve alongside a side of brown rice or coconut rice for a complete meal.

Nutrition

Calories: 314kcalCarbohydrates: 10gProtein: 32gFat: 17gSaturated Fat: 2gPolyunsaturated Fat: 2gMonounsaturated Fat: 10gTrans Fat: 0.02gCholesterol: 286mgSodium: 1287mgPotassium: 394mgFiber: 2gSugar: 2gVitamin A: 974IUVitamin C: 31mgCalcium: 152mgIron: 1mg
Tried this recipe?Let us know how it was!

About Me

I’m Melanie.

I’m a chef, registered dietitian, foodie, wife and mom.
If you’re looking for quick and healthy meal inspiration that serves YOU and your family well, then you’ve come to the right place!

Melanie Marcus Selfie

How to cook lentils perfectly (recipe + tips)

I find that lentils can either be a kitchen staple for clients, or they shy away from them because they don’t know how to prepare them.  The reality is, dry lentils are versatile, nutritious, and easy to prepare. They offer rich texture and earthy flavors which are a great addition to most ground meat recipes, but a staple for vegetarian recipes.  If you use black beans in your recipes, you can often substitute lentils instead.  

Whether you’re new to cooking lentils or looking to refine your technique, this guide will provide you with essential tips and recipes for various types of lentils.

Why are lentils so healthy?

Lentils are small round legumes that come in many different colors, shapes, and sizes. They are a great source of plant-based protein, making them an excellent meat alternative for vegetarians and vegans. With their high dietary fiber content, lentils aid in digestion and promote a feeling of fullness, supporting weight management. They are also packed with essential vitamins and minerals such as folate, iron, phosphorus, and potassium.

Nutritional Benefits of Lentils

  • High in Plant-Based Protein: Ideal for vegetarians and vegans.
  • Rich in Dietary Fiber: Promotes digestion and fullness.
  • Low in Fat: Provides steady energy without blood sugar spikes.
  • Packed with Vitamins and Minerals: Essential for overall health.
  • Antioxidants: Help reduce inflammation.  

Macros

A half-cup (about 100 grams) of cooked brown lentils typically contains the following macronutrients:

  • Calories: 115-120 kcal
  • Protein: 9 grams
  • Carbohydrates: 20 grams
    • Fiber: 8 grams
  • Fat: 0.4 grams

These values can vary slightly depending on cooking method and specific type of lentils.

Join my next 6 week challenge!

Tired of endless diets and no results? Join the FASTer Way to Fat Loss and see real, sustainable changes in just 6 weeks!

Melanie Marcus FASTer Way to Fat Loss Coach

Cooking Tips for Lentils

Rinse Lentils: Always rinse lentils under cold water to remove dirt, small rocks or debris. Look for small stones or rocks and remove them.

Soak Them: Letting them sit for even just 30 minutes (or overnight) will reduce cooking time by at least 15 minutes.  

Sauté for Flavor: Sauté onions, garlic, bay leaves and spices in olive oil before adding lentils and water for enhanced flavor. 

Water Ratio: Use plenty of water, a ratio of 3 cups of water for every 1 cup of lentils. Adjust as needed for different types of lentils.  In culinary school we removed excess water afterwards in a colander.  

Salt Timing: Add a pinch of salt towards the end of cooking to ensure the lentils are tender but not mushy.

Tender but Firm: For salads or cold dishes, cook lentils just until al dente to maintain a firm texture.

Quick Cooking: For a faster cooking process, consider soaking lentils for a few hours or overnight.  You’ll notice that they plump up and absorb a lot of water which will help reduce the cooking time.  

Free lentils tricolor image

Types of Lentils and How to Cook Them

Red Lentils (Masoor Dal)

Other Names: Orange Lentils

  • Cooking Time: 15-20 minutes
  • Texture: Soft and creamy
  • Flavor: Mild and slightly sweet
  • Best For: Soups, stews, and Indian cuisine
  • Instructions:
  1. Rinse 1 cup of red lentils under cold water.
  2. In a large pot, sauté onions, garlic, and your favorite spices in olive oil.
  3. Add the lentils, 3 cups of water, and bring to a boil.
  4. Reduce heat and simmer for 15-20 minutes until tender.
  5. Add salt towards the end of cooking.

Brown Lentils

Other Names: The most common type of lentils

  • Cooking Time: 20-30 minutes
  • Texture: Soft but holds shape
  • Flavor: Earthy and mild
  • Best For: Soups, stews, and veggie burgers
  • Instructions:
  1. Rinse 1 cup of brown lentils under cold water.
  2. Sauté onions, garlic, and spices in olive oil in a large pot.
  3. Add the lentils, 3 cups of water or vegetable broth, and bring to a boil.
  4. Reduce heat and simmer for 25-30 minutes until tender.
  5. Add salt towards the end of cooking.

Green Lentils

Other Names: French Lentils, Le Puy, Lentils de Puy and French green lentils

  • Cooking Time: 30-40 minutes
  • Texture: Firm and peppery flavor
  • Flavor: Earthy and robust
  • Best For: Salads, side dishes, and soups
  • Instructions:
  1. Rinse 1 cup of green lentils under cold water.
  2. Sauté onions, garlic, and spices in olive oil in a large pot.
  3. Add the lentils, 3 cups of water or vegetable stock, and a bay leaf.
  4. Bring to a boil, then reduce heat and simmer for 30-40 minutes until tender.
  5. Add salt towards the end of cooking.

Black Lentils

Other Names: Black Beluga Lentils

  • Cooking Time: 25-30 minutes
  • Texture: Firm and holds shape
  • Flavor: Rich and earthy
  • Best For: Salads, side dishes, and lentil salad
  • Instructions:
  1. Rinse 1 cup of black lentils under cold water.
  2. Sauté onions, garlic, and spices in olive oil in a large pot.
  3. Add the lentils, 3 cups of water or vegetable broth, and bring to a boil.
  4. Reduce heat and simmer for 25-30 minutes until tender.
  5. Add salt towards the end of cooking.

Using an Instant Pot or Pressure Cooker

For faster cooking, you can use an instant pot or pressure cooker. Follow the same steps but reduce the water to 2 cups for every 1 cup of lentils. Cook on high pressure for half the time specified for each type.

Storing Cooked Lentils

Store cooked lentils in an airtight container in the refrigerator for up to a week. They make excellent additions to salads, soups, and meal prep.

Favorite Lentil Recipes

  • Red Lentil Soup with fresh herbs and lemon juice
  • Brown Lentil Stew with hearty vegetables
  • French Green Lentil Salad with fresh herbs and olive oil
  • Black Lentil Salad with roasted vegetables and a tangy dressing
  • Greek Inspired Turkey Meatballs (with lentils!)

About Me

I’m Melanie.

I’m a chef, registered dietitian, foodie, wife and mom.
If you’re looking for quick and healthy meal inspiration that serves YOU and your family well, then you’ve come to the right place!

Melanie Marcus Selfie

Greek inspired turkey meatballs (with lentils!)

If you’re looking to change up your turkey meatball game, or if you just love mediterranean flavors.  This recipe is it.  This recipe combines lean ground turkey with the hearty goodness of lentils and the tangy taste of feta.  They’re a great way to meal prep a hearty meal when served with pasts or a lighter lunch when served over salad or along side fresh cut vegetables and hummus.  

Jump to Recipe

Ingredients and substitutions

  • lean ground turkey – I use the leanest ground turkey I can find.  This allows me to balance the fat I add back in from the feta.
  • brown lentils (cooked and cooled) – Using a cup of lentils not only adds plant based fiber and protein, but it also adds moisture which turkey meatballs (especially when you use extra lean turkey) needs. I prefer to use dry lentils for this recipe.  I soak them for 20 minutes.  Then drain and boil for about 20 minutes until cooked through. You could use canned lentils, just be sure to rinse and drain them really well.  Cooked green lentils would be fine too.  Just be careful with red lentils because they cook quickly and could make your meatballs mushy.  They are simply delicious in this red lentil soup recipe though!
  • Feta cheese – use what you love.  My favorite is Trader Joe’s Sheep’s Milk Feta and it happens to come in 2, 5oz bars which makes measuring for this recipe very easy. You could also use crumbled cow’s milk feta.  
  • egg – one egg is all you need, you could use two eggs whites.  I don’t recommend a flax egg for this one! This is when you combine flax seed and warm water to form a thick mixture to form a binder.  
  • gluten-free bread crumbs – I’ve tested this recipe with both gluten free and regular bread crumbs. Either way, I recommend using plain.   
  • chopped arugula – I usually use a ton of fresh parsley, but I was out when this recipe came to life.  So I used fresh arugula and it was delicious.  You could use dill, parsley or a combo of all three!
  • salt – It’s pretty standard to use 1 tsp per pound of meat.  I like to use kosher salt or my favorite Seasonello, Italian seasoning salt.  
  • black pepper – 1/4 – 1/2 tsp of red chili flakes would be a nice addition!
  • optional  ingredients – lemon zest  or chopped green onions for extra flavor.

Cooking Instructions

Jump to Recipe

Step 1:

Preheat your oven to 375°F (190°C) and line a baking sheet with parchment paper.

Step 2:

In a large bowl, mix ground turkey with 1 cup of cooked brown lentils with feta, egg, gluten-free breadcrumbs, chopped arugula, salt, and black pepper. You could use a food processor to pulse the mixture until well combined but I just mix everything together with my hands.  

Step 3:

Form the lentil mixture into 1-inch meatballs with your hands or an ice cream scoop.  Place them on a prepared 9×13 baking pan.  

Step 4:

Bake the meatballs for about 40 minutes or until they are golden brown and cooked through to an internal temperature of 165°F.  Store in an airtight container in the refrigerator for 5 days.  

Serving Suggestions

These Greek-inspired turkey meatballs are versatile and can be served in a variety of ways:

  • Over Greek Yogurt Sauce: Serve the meatballs over a bed of zesty Greek yogurt sauce, accompanied by fresh arugula salad tossed in a light lemon vinaigrette.
  • With Pita Bread: Pair the meatballs with warm pita bread, hummus, and a side of roasted vegetables for a heartier meal.
  • In Pasta Dishes: Add the meatballs to your favorite pasta dish or grain bowl for an extra protein boost.
  • Low Carb Option: Serve the meatballs over sautéed spaghetti squash for a low-carb alternative.
Jump to Recipe

Unique Elements

What sets this recipe apart are the unique elements that blend traditional Greek flavors with a modern twist:

  • Protein Boost:  Talk about high protein.  Five of these meatballs provide 39g protein and 9 grams of fiber!  
  • Healthy Lentils: The addition of lentils, whether brown, red, or green, not only adds a hearty texture but also boosts the nutritional value of the meatballs. The added fiber will also help maintain blood sugar if you enjoy these with pasta.
  • Chopped Arugula: Incorporating arugula into the meatballs introduces a peppery flavor that complements the richness of the ground turkey and feta.
  • Pulse in Food Processor: Using a food processor to mix the ingredients ensures a well-combined mixture, making it easier to form consistent meatballs.
  • Versatile Serving Options: From pita bread to Greek yogurt sauce, these meatballs can be adapted to suit various dishes and preferences.

This is such a delicious recipe, I hope you make it.  And if you do, please let me know! You may also like our original family favorite meatball recipe.

Mediterranean Turkey Lentil Meatballs

Prep Time 5 minutes
Cook Time 45 minutes
Total Time 50 minutes
Cuisine Mediterranean
Servings 7
Calories 360 kcal

Ingredients
  

  • 2 pounds 98% lean ground turkey
  • 1 cup lentils cooked
  • 1/4 cup gluten free breadcrumbs
  • 1 each egg
  • 2 oz feta cheese
  • 1 cup arugula chopped
  • 1.5 tsp salt
  • 1/2 tsp pepper
  • 2 cloves garlic mashed
  • .5 tsp garlic powder

Instructions
 

  • Combine all ingredients in a large bowl.
  • Use a small cookie scoop to portion out meatballs. I usually slightly overfill a 1 oz scoop and get about 35 meatballs.

Nutrition

Serving: 5meatballsCalories: 360kcalCarbohydrates: 20gProtein: 35gFat: 16gSaturated Fat: 6gPolyunsaturated Fat: 4gMonounsaturated Fat: 5gTrans Fat: 0.1gCholesterol: 114mgSodium: 822mgPotassium: 569mgFiber: 9gSugar: 1gVitamin A: 260IUVitamin C: 2mgCalcium: 150mgIron: 4mg
Keyword lentil
Tried this recipe?Let us know how it was!

Gluten & Dairy Free Cranberry Coconut Bars Recipe

Autumn is nearly upon us, and what better way to celebrate than with a treat that can double as an afternoon snack or just something to enjoy with a cup of tea? These would also be cute to serve at holiday parties wrapped in parchment paper. They’re just the thing you need when you’re craving something sweet but still want to stick to your gluten free diet. The first time I made these I was plesantly surprised with the flavor and texture.  They’re a softer version of a granola bar and remind me of my moms famous chocolate almond oaties.  (THE BEST cookie ever!) Also good are these 3 ingredient banana cookies that can double as breakfast. You’re welcome!

These are the perfect treat to add to your cookie platter to accomodate your GF guests this holiday season.  They can also be made in one bowl with a spatula.  No need to pull out your mixer and paddle attachment. Careful… these may easily become your favorite dessert for this time of year.  

Jump to Recipe

Ingredients and substitutions:

  • almond milk or milk of choice.  Coconut milk would be a great option.
  • brown sugar – You could use coconut sugar or any other dry sugar like white sugar.  If you use maple syrup, agave or honey the mixture may become too wet.  
  • ground flax seed – chia seeds work well here too. The flax helps to bind the recipe, similar to eggs. Check out this flax egg recipe for heart healthy or vegan cooking.
  • coconut oil – any neutral oil will work for this.  Avocado oil, safflower oil or vegetable oil all work well.   
  • vanilla extract
  • very ripe bananas – pumpkin puree would be good here, but make sure you like pumpkin flavor!
  • dried cranberries – cranberries without added sugar are TART, so be ware of what you buy and what you have on hand. In this case, I like that they balance the sweetness from the coconut.
  • rolled oats – you can use instant oats instead.  I do not recommend using steel cut oats, they will be too firm.  
  • unsweetened coconut flakes
  • cinnamon
  • gluten-free flour blend – I like the King Arthur gf flour blend.  It can be used as a 1:1 substitute for your AP flour.  If you don’t have an intolerance, you can use regular flour.
  • kosher salt or sea salt 

Optional mix ins:  walnuts, orange zest, white chocolate chips, dark chocolate chips, mini marshmallows or raisins.  

Why You’ll Love These Cranberry Bars

These bars are the perfect balance of sweet and tart, thanks to the dried cranberries and the subtle sweetness of coconut. I like to cut them into 16 squares so I can have two (which is a full serving) or just one as a quick snack to limit macros.

Jump to Recipe

Step-by-Step Instructions

Step 1: Prep Your Baking Pan and Oven

Preheat your oven to 350°F (175°C). Line an 8×8 inch baking pan with parchment paper, leaving an overhang for easy removal later.

Step 2: Prepare Flax Seed Mixture

In a small bowl, mix 2 tablespoons of ground flax seed with 6 tablespoons of water. Set aside for 5 minutes to thicken.

Step 3: Combine Wet Ingredients

In a large bowl, mash the very ripe bananas with a fork. Add the melted coconut oil, almond milk, brown sugar, and vanilla extract. Mix well until all the ingredients are combined.

Step 4: Mix Dry Ingredients

In a separate bowl, combine the gluten-free flour blend, baking powder, cinnamon, and kosher salt.

Step 5: Combine Wet and Dry Ingredients

Gradually add the dry ingredients to the wet ingredients, mixing until just combined.

Step 6: Fold in Oats, Coconut, and Cranberries

Fold in the unsweetened coconut, dried cranberries, and rolled oats. The batter should be thick and well mixed.

Step 7: Bake

Spread the batter evenly into the prepared baking pan. Bake for 30-40 minutes, or until the top is golden brown and a toothpick inserted into the center comes out clean.

Step 8: Cool and Slice

Allow the bars to cool in the pan for 10 minutes, then transfer them to a wire rack to cool completely. Once cooled, slice into bars and enjoy!

Optional:

For an extra touch, drizzle with melted white chocolate and then wrap in parchment with bakers twine.

Tips for the Perfect Cranberry Coconut Bars

Use High-Quality Ingredients

For the best results, use high-quality, certified gluten-free ingredients, especially if you have gluten intolerances!  King Arthur and Bob’s Red Mill both have a variety of options.  

Customize Your Bars

Feel free to add in some orange zest or fresh cranberries for extra flavor. 

Storage

Store your gluten-free cranberry coconut bars in an airtight container at room temperature for up to a week. Once cooled, I place them in a gallon zip lock bag and then freeze for up to 3 months for quick lunch additions or snacks.

Tips for Macros

This recipe makes 8 servings. I prefer to cut them into 16 squares, so I can enjoy half quickly.

With 29g carb, 13g fat and 3g each protein and fiber these are satisfying, nutrient dense and made of whole foods to fuel your activity!

Join my next 6 week challenge!

Tired of endless diets and no results? Join the FASTer Way to Fat Loss and see real, sustainable changes in just 6 weeks!

Melanie Marcus FASTer Way to Fat Loss Coach

If you loved this recipe, be sure to check out my other gluten-free baking recipes (like my gluten free blondies) and sign up for our newsletter to get new recipes delivered straight to your inbox.

Happy baking!

Cranberry Bar – Gluten Free

Prep Time 10 minutes
Cook Time 40 minutes
Total Time 50 minutes
Course Dessert
Cuisine American
Servings 8
Calories 240 kcal

Ingredients
  

  • 1/4 cup coconut milk or milk of choice
  • 1/2 cup brown sugar
  • 1 tbsp ground flax seed
  • 1/4 cup coconut oil melted
  • 1 tsp vanilla extract
  • 2 each rips bananas
  • 1/3 cup cranberries dried
  • 1.5 cups rolled oats
  • 1/2 cup unsweetened coconut
  • 1/2 tsp cinnamon
  • 1/4 cup gluten free flour mix
  • 1/2 tsp baking powder
  • 1/8 tsp kosher salt

Instructions
 

  • Preheat oven to 350F. Line 8 inch square pan with parchment and set aside.
  • Peel and mash bananas in large bowl. Add sugar, flax, milk, oil and vanilla. Whisk together.
  • In another bowl, mix your dry ingredients. Add the wet mixture to the dry mixture and stir well. Pour batter into pan and smooth out with a spoon or hands and press it down firmly.
  • Bake at 350°F for 40 minutes until the edges begin to golden and it is slightly firm to touch. Allow to cool in pan for 10 minutes before transferring to a wire rack and cooling completely. Slice into 8-16 bars.

Nutrition

Serving: 8gCalories: 240kcalCarbohydrates: 29gProtein: 3gFat: 13gSaturated Fat: 10gPolyunsaturated Fat: 1gMonounsaturated Fat: 1gSodium: 71mgPotassium: 134mgFiber: 3gSugar: 15gVitamin A: 3IUVitamin C: 1mgCalcium: 43mgIron: 1mg
Tried this recipe?Let us know how it was!

About Me

I’m Melanie.

I’m a chef, registered dietitian, foodie, wife and mom.
If you’re looking for quick and healthy meal inspiration that serves YOU and your family well, then you’ve come to the right place!

Melanie Marcus Selfie

Healthier Recipe for chewy Gluten-Free Blondies

No butter, no eggs, xanthan gum

Full disclosure.  This recipe is still a treat, AND it has a good amount of sugar in it.  That said, these have a lot of redeeming qualities like protein, fiber and healthy fats because we’re using almond butter, almond flour and white beans  to keep it vegan if that’s a concern for you. I know, I said beans.  But stick with me, no one will know they are in there.  

So… if you’re craving a sweet treat but want to keep it healthy-ish these healthier blondies will satisfy your sweet tooth while keeping your macros on track. These blondies are vegan, vegetarian, and gluten-free, making them perfect for anyone with dietary restrictions or preferences. Plus, they’re made from simple ingredients that you probably already have in your pantry.

Jump to Recipe

Ingredients

Here’s what you’ll need to make these delicious and healthier blondies:

  • 1 can white beans, drained and rinsed very well
  • 1 tsp baking powder
  • 1/4 tsp each of salt and baking soda
  • 3/4 cup granulated sugar (you can also use coconut sugar, or light brown sugar for a distinct taste)
  • 1/2 cup almond flour or almond meal
  • 1/4 cup mashed banana
  • 1/4 cup nut butter (like almond butter or peanut butter)
  • 1/4 cup chocolate chips (or butterscotch chips if you prefer)
  • 1 tsp vanilla extract
Jump to Recipe

Instructions

Follow these steps for the best results:

Preheat Your Oven

  1. Preheat your oven to 350 degrees Fahrenheit. Grease an 8×8 baking pan or line it with parchment paper to prevent sticking.

Blend Ingredients

  1. In a good food processor, blend all the ingredients (except the chocolate chips) until very smooth. If you don’t have a food processor, an electric mixer and a large mixing bowl will work too.  Just ensure to blend the beans very well.

Incorporate Chocolate Chips

  1. Mix the chocolate chips into the blondie batter using a wooden spoon. You can also add some chocolate chips on top for extra gooeyness.

Bake

  1. Scoop the batter into the prepared baking pan.  I used a square baking tin. Bake for 30 minutes. The blondies will look a little undercooked when you take them out, but they will firm up as they cool to a golden brown once they reach room temperature.

Cool Down

  1. Allow the blondies to cool in the baking pan.  Once cooled, you can cut them into squares. Store the blondies in an airtight container to keep them fresh.

Additional Tips

Gluten-Free Options

 For those avoiding gluten, ensure all your dry ingredients, like almond flour, are certified gluten-free. Bob’s Red Mill and other high-quality brands offer great options.  These are made with naturally gluten-free ingredients, but you’ll want to be sure they’re certified if you have celiac disease.

Sweetener Alternatives

If you’re looking to reduce the sugar content, consider substituting granulated sugar with monk fruit sugar. It’s a natural sugar substitute that can be exchanged 1:1 for regular sugar in baking.  It’s a little pricey though, but worth it if you need to keep refined sugars down.  

I don’t recommend maple syrup or honey for this recipe because the blondies won’t firm up as needed with it.  The structure of the solid sugar is what helps create the soft but stable final texture.  

Oil Substitutes

   In this recipes we’re using mashed banana instead of melted butter, vegan butter, or even coconut oil.

Join my next 6 week challenge!

Tired of endless diets and no results? Join the FASTer Way to Fat Loss and see real, sustainable changes in just 6 weeks!

Melanie Marcus FASTer Way to Fat Loss Coach

Why you’ll love these Healthier Blondies?

Nutritional Benefits

 Using ingredients like white beans and almond flour not only makes these treats gluten-free but also boosts their protein and fiber content.

Versatility

 Whether you’re a seasoned baker or it’s your first time, this easy recipe allows for plenty of customization. Add in butterscotch chips, semi-sweet chocolate chips, walnuts, or even white chocolate chips for different variations.

Storage

This gluten free blondie recipe stores very well.  Once they’re cut, place them in an airtight container and keep in the freezer for snacks as needed.  This helps with portion control and is a good idea to keep the high quality of these bars!

If you try these gluten free blondies- and I hope you do – tag me on social media and use the hashtag #MissNutritiousEats so I can see your creations!

Making these almond flour blondies is not just easy; it’s a really tasty way to enjoy a dessert bar without compromising your dietary needs. 

Gluten Free Blondies

Course Dessert, Snack
Servings 30
Calories 52 kcal

Ingredients
  

  • 1 can white beans drained and rinsed very well
  • 1 tsp baking powder
  • 1/4 tsp baking soda
  • 3/4 cup granulated sugar you can also use coconut sugar, or light brown sugar for a distinct taste
  • 1/2 cup almond flour
  • 1/4 cup mashed banana
  • 1/4 cup nut butter like almond butter or peanut butter
  • 1/4 cup chocolate chips or butterscotch chips if you prefer
  • 1 tsp vanilla extract
  • 1/4 tsp salt

Instructions
 

  • Preheat your oven to 350 degrees Fahrenheit. Grease an 8×8 baking pan or line it with parchment paper to prevent sticking.
  • In a good food processor, blend all the ingredients (except the chocolate chips) until very smooth. If you don’t have a food processor, an electric mixer and a large mixing bowl will work too. Just ensure to blend the beans very well.
  • Mix the chocolate chips into the blondie batter using a wooden spoon. You can also add some chocolate chips on top for extra gooeyness.
  • Scoop the batter into the prepared baking pan. I used a square baking tin. Bake for 30 minutes. The blondies will look a little undercooked when you take them out, but they will firm up as they cool to a golden brown once they reach room temperature.
  • Allow the blondies to cool in the baking pan. Once cooled, you can cut them into squares. Store the blondies in an airtight container to keep them fresh.

Nutrition

Calories: 52kcalCarbohydrates: 7gProtein: 1gFat: 3gSaturated Fat: 0.4gPolyunsaturated Fat: 0.3gMonounsaturated Fat: 1gSodium: 43mgPotassium: 27mgFiber: 0.5gSugar: 6gVitamin A: 1IUVitamin C: 0.2mgCalcium: 20mgIron: 0.2mg
Tried this recipe?Let us know how it was!

About Me

I’m Melanie.

I’m a chef, registered dietitian, foodie, wife and mom.
If you’re looking for quick and healthy meal inspiration that serves YOU and your family well, then you’ve come to the right place!

Melanie Marcus Selfie

The Absolute Best Zucchini Lasagna Recipe (low carb)

I can’t remember a summer where we didn’t have zucchini lasagna on the menu. Whether it was a big family gathering at the lake, or a quiet dinner on the back porch, this veggie-packed twist on traditional lasagna is a summer comfort food not to be missed.  Trust me :). It’a a staple summer zucchini recipe.

Jump to Recipe

It’s hard to resist layers of gooey cheese and rich meat sauce but summer months aren’t conducive for such a heavy dish. So if you’re looking to keep things on the lighter side, this simple zucchini lasagna recipe is a great option. It combines fresh garden zucchini with extra lean ground turkey for a low-carb take on traditional lasagna. The best part, is that I don’t have to spend hours in the kitchen.  Basically just brown some turkey to make a bolognese sauce of sorts and then layer up with slices of zucchini and layers of cheese.  It’s perfection.

Ingredients and substitutions:

  • Zucchini:  You just wouldn’t have this dish without it!  Though you could substitute yellow squash.  
  • Extra lean ground turkey:  Certainly use ground chicken, ground beef or any other ground meat that you have on hand.  
  • Rao’s marinara sauce:  I insist on Rao’s if you want a delicious outcome with the least effort. Feel free to substitute with your favorite tomato sauce.
  • Mozzarella cheese:  I use part skim mozzarella cheese
  • Pesto:  You could omit, but I think this is the secret ingredient.  I love using Costco’s Basil Pesto.  It’s the best tasting pre-made pesto I’ve tried.  
  • Olive oil: In a pinch you could use another neutral oil.  
  • Salt and pepper to taste
  • Fresh basil leaves for garnish 
  • Optional:  red pepper flakes, italian seasoning, other fresh herbs of choice
Jump to Recipe

Instructions:

  1. Prepare the Zucchini:Start by washing your zucchinis. Using a mandoline slicer or a sharp knife, slice them into thin strips, about 1/4-1/2 inch thick. Take care to remove large seeded areas.  
  2. Preheat the Oven:Preheat your oven to 350°F.
  3. Cook the Ground Turkey:Heat olive oil in a large skillet over medium heat. Add the ground turkey and cook until browned, breaking it apart with a spatula. Once cooked, stir in the tomato sauce. Let the sauce simmer for a few minutes. If you prefer a richer flavor, you can mix in a bit of tomato paste. 
  4. Assemble the Lasagna:Start by spreading a thin layer of tomato sauce at the bottom of the dish. Place a single layer of zucchini slices on top. Be sure the zucchini strips are close together but not overlapping too much. Sprinkle a layer of mozzarella cheese and half of the pesto.  Repeat the layers, ending with a layer of zucchini and a sprinkle of mozzarella cheese on top.
  5. Bake the Lasagna:Cover the baking dish with aluminum foil to prevent the top from browning too quickly. Bake for 30 minutes. After 30 minutes, remove the foil and bake for an additional 15-20 minutes, or until the top is golden brown and bubbly.
  6. Let it Rest:Allow the lasagna to rest for about 10 minutes before serving. This helps the layers set and makes it easier to cut into squares without a watery mess.
  7. Garnish and Serve:Garnish with fresh basil leaves and a sprinkle of additional Parmesan cheese if desired. Serve warm and enjoy!
Jump to Recipe

Tips for Perfect Zucchini Lasagna:

  • Preventing Watery Lasagna: To avoid excess moisture, ensure you have removed as much water as possible from the zucchini slices before assembling the lasagna. If you have any extra liquid on the bottom of the pan, you can drain it off before serving.
  • Storing Leftovers: Store any leftover zucchini lasagna in an airtight container in the refrigerator for up to 3 days. It’s even better the next day, as the flavors have more time to meld together. It also freezes really well so it’s a great way to meal prep for another night.
  • Adjusting for Dietary Needs: This recipe is a low-carb zucchini lasagna, but you can customize it with different kinds of cheese or add extra veggies to suit your taste preferences. For a different twist, try incorporating some cooked ground chicken or Italian sausage.
  • ​Easy Clean Up:  I highly recommend cooking this off on a baking sheet to prevent drips and spills in the oven.

Join my next 6 week challenge!

Tired of endless diets and no results? Join the FASTer Way to Fat Loss and see real, sustainable changes in just 6 weeks!

Melanie Marcus FASTer Way to Fat Loss Coach

FASTer Way Friends

Make this recipe on a Sunday for meal prep to take you through both low carb and regular macro days.  Serve with whole grain or chickpea pasta noodles to get your carbs in.  Or serve with Miracle noodles for lower carbs.  With only 9g carbs this qualifies as a keto lasagna for sure.  

This zucchini lasagna is not only a healthier alternative to traditional lasagna but also a versatile and satisfying dish that will earn rave reviews from your family. Enjoy this comforting meal without the extra carbs, and savor the fresh flavors of garden zucchini and lean ground turkey.

Zucchini Lasagna

This is a family favorite that can fit into any meal plan.
Prep Time 10 minutes
Cook Time 50 minutes
Total Time 1 hour
Course Main Course
Cuisine American, Italian
Servings 6
Calories 368 kcal

Equipment

  • 9×14 baking pan

Ingredients
  

  • 1 jar Raos tomato sauce
  • 1 zucchini large
  • 12 oz mozzarella cheese shredded
  • 16 oz extra lean ground turkey
  • 2 tsp olive oil
  • Salt and pepper to taste
  • 1/4 cup basil pesto

Instructions
 

  • Cut zucchini into 1/4 inch planks
  • Cook ground turkey with olive oil until cooked through. Season with salt and pepper to taste.
  • Add tomato sauce and cook until heated through
  • Layer tomato mixture, cheese, pesto and zucchini in pan, ending with cheese.
  • Bake at 350F for 50 minutes, uncovering for last 5 minutes to get color on top.

Notes

Zucchini lasagna is one of those recipes that I look forward to all year long.  I enjoy with miracle noodle on low carb days or some brown rice pasta on regular macro days.  The best part is that I can throw it together, it freezes well and my whole family loves it.  


Nutrition

Calories: 368kcalCarbohydrates: 9gProtein: 29gFat: 25gSaturated Fat: 10gPolyunsaturated Fat: 3gMonounsaturated Fat: 7gTrans Fat: 0.1gCholesterol: 102mgSodium: 1044mgPotassium: 626mgFiber: 2gSugar: 6gVitamin A: 1203IUVitamin C: 14mgCalcium: 340mgIron: 2mg
Keyword easy, kid friendly, summer
Tried this recipe?Let us know how it was!

About Me

I’m Melanie.

I’m a chef, registered dietitian, foodie, wife and mom.
If you’re looking for quick and healthy meal inspiration that serves YOU and your family well, then you’ve come to the right place!

Melanie Marcus Selfie